


The new MacBook Pro killed the Touch Bar – Numerama, use the Touch Bar on Mac – Apple Assistance (CA)
![]()
Use the Touch Bar on Mac
The future of Numerama is coming soon ! But before that, we need you. You have 3 minutes ? Answer our investigation
The new MacBook Pro have killed the Touch Bar
The new MacBook Pro announced by Apple mean the end of a feature that appeared on the previous generation: the Touch Bar, which has never really convinced it in use.
Touchbar: 2016 – 2021. At the age of the small screen covered with touch keys that no one has really known what to do. Because yes, the new MacBook Pro, equipped with a M1 Pro or M1 Max chip, no longer adorn this small strip normally located above the traditional keyboard and giving access to dynamic shortcuts (depending on the application used). On its future laptops, Apple decided to remove the Touch Bar, killing at the same time all the promises that accompanied it when it appeared on the previous generation of MacBook Pro (in 2016, therefore).
It must be said that the Touch Bar has never really convinced, despite a high -end positioning which suggested real use to that and those who were ready to put a few hundred euros more to take advantage of it. She will finally join the rare failure cemetery attributed to the Cupertino firm. And we really can’t see how Apple could resuscitate it (except to play Doom)).
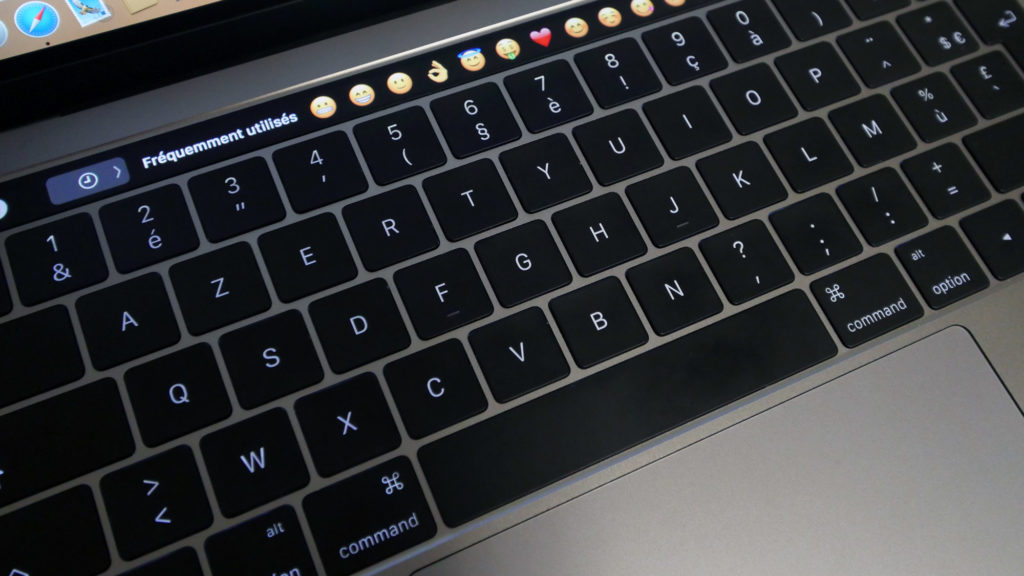
The Touch Bar quickly became the Emoji Bar
“” The designers with whom we have discussed have as well laughed: for them, the Touch Bar is useless since they work with shortcuts and, worse, is an insult to ergonomics insofar as it is not in addition an interface that can be pretended to simplify it », We wrote about this functionality in our test of the MacBook Pro released in 2016. At the time, we still left the benefit of the doubt in Apple. Today, it must be recognized that the Cupertino firm has failed to find a real interest in the Touch Bar-beyond Gimmick. And its abolition, five years later, validates our observation of departure: what was thought of as an ergonomic addition was not obvious. By imposing new habits, the Touch Bar has missed its subject. It would have taken better software integration, which required everyone to play the game (including third parties).
By force, the Touch Bar ended up being reduced to the simple status of Emoji Bar: a means, faster and funny for once, to flood the social networks of these small icons which have become a real means of expression. It was clearly not Apple’s goal at the base, who thought he was providing an additional productivity tool to an audience used to never looking at his keyboard. So a bar above … Touch bar or the false good idea.
Finally, the Touch Bar will remain linked to a MacBook Pro which will have known many failures. Indeed, it was also he who introduced the butterfly keyboard, a real ball that Apple has dragged for several years and never really knew how to correctly rectify. To the point of abandoning it once and for all after insufficient fixes. In addition to introducing new overpowered chips, wearing a new mini LED screen (120 Hz) and returning to a more supplied endowment on the connector side (HDMI and SD cards), the new MacBook Pro take a big line On course errors.
The MacBook Pro M1 had started this reconquest of the market, the MacBook Pro M1 Pro and M1 Max finish work.
This content is blocked because you have not accepted cookies and other tracers. This content is provided by YouTube.
To be able to visualize it, you must accept the use being operated by YouTube with your data which can be used for the following purposes: Allow yourself to view and share content with social media, promote development and improvement of products D’humanoid and its partners, display you personalized advertisements in relation to your profile and activity, define you a personalized advertising profile, measure the performance of the advertisements and content of this site and measure the audience of this site ( more)
The future of Numerama is coming soon ! But before that, we need you. You have 3 minutes ? Answer our investigation
Use the Touch Bar on Mac

If your Mac has a Touch Bar, you can use the usual gestures (such as touch, sweep or slide) directly on the Touch Bar to adjust settings, use Siri, access function keys and perform tasks in apps.
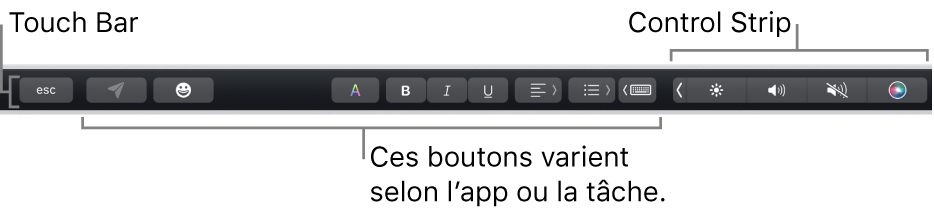
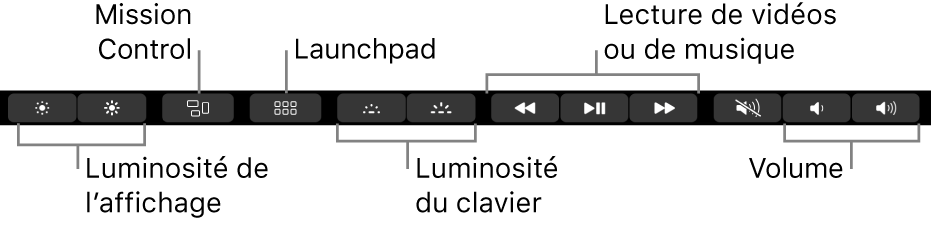
Control strip
The control strip, located to the right of the Touch Bar, allows you to use Siri or easily modify common settings. Simply touch the buttons or, for settings like brightness and volume, quickly sweep the buttons to the left or to the right. You can also develop the control strip to access more buttons.
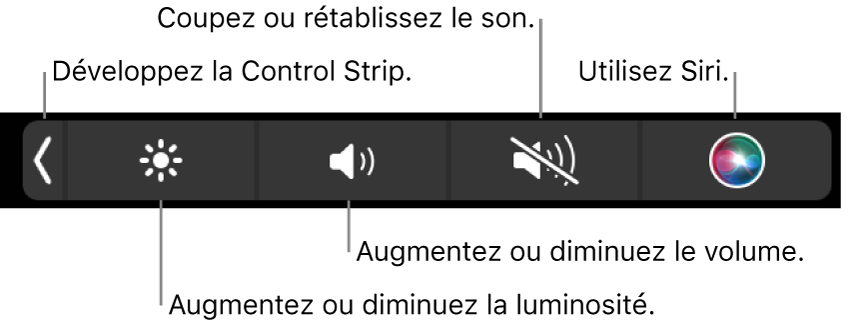
- To develop control strip: Touch . Depending on the model of your Mac and your customization of the Touch Bar, you can also press the FN key or the one that represents a globe
 on the keyboard to develop the control strip.
 - To use the buttons of the Control Strip: Tap the buttons to modify the settings, or control audio or video playback. For some settings, such as screen brightness, you can touch and keep the button to modify the setting.
- To condense the control strip: Touch .
APP buttons
The other buttons of the Touch Bar vary depending on the app you use or the task you are performing. Each app is different, try the Touch Bar to find out what you can do.
For example, here are the buttons available in the Touch Bar when you select a file in the Finder:
![]()
And here are the buttons available when a photo is displayed in the photo app:
![]()
You can use the Touch Bar to quickly add emojis to your text in some apps. Just touch
, sweep to scroll through emojis (organized by category, for example frequently used or emoticons and people), then touch the one you want to use.
Trick : In some apps, you can customize the Touch Bar and add buttons for the tasks that you do most often.
Suggestions
When you enter text on your Mac, the Touch Bar can display words or expressions that you may want to use then (called suggestions) to save you time.
- To display suggestions: Touch .

- To use suggestions: Touch a word, a sentence or an emoji. Spelling corrections appear in blue.

- To hide suggestions: Touch the Touch Bar.
If not displayed in the Touch Bar, select Display> Customize the Touch Bar, then select “Display suggestions”. Otherwise, choose the apple menu


> System settings, click keyboard in the sidebar (you may have to scroll down), click on the right touch bar settings, then activate “display the input suggestions”.
While performing your entry, you can display a list of words on the screen by pressing F5 (depending on your Mac model, you may also have to press the FN key).
Colors
In the apps where you can modify the color of the text or elements, you can use the Touch Bar to select a color, a shade or a mode (such as RGB or TSL).

- To select a color: Hold your finger on, then drag your finger to a color.

- To select a shade: Touch, hold your finger on a color, then slide your finger until a nuance.
- To select a personalized mode or color: Tap, touch the color list on the left, then touch a colorimetric mode, like RGB. To use a personalized color that you have saved, touch samples.
 Use the sliders of a mode to modify the values, such as shade or saturation. To save your modifications in samples, touch the color (a sign + appears), then touch it again (a check check appears).
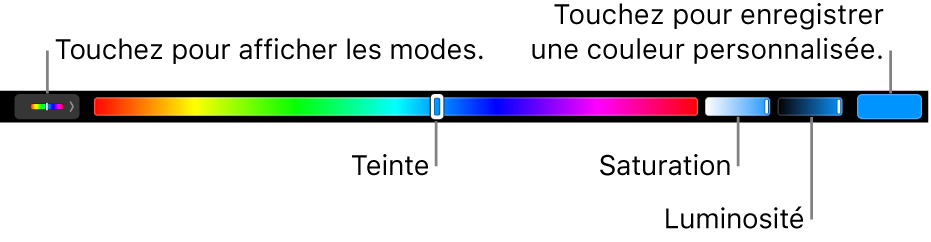
- To mask colors or color values: Touch the Touch Bar.
Function keys
Lots of macOS keyboard shortcuts use function keys (F1 to F12). For example, F11 displays the office. On a Mac with a Touch Bar, the function keys are displayed there.
- To display the function keys in the Touch Bar, press the FN key or the one that represents a globe extended (depending on the model of your Mac) on the keyboard. Make sure to customize the Touch Bar in the keyboard settings so that the function keys appear when you press the button in a prolonged manner.

- Touch a function key. If a keyboard shortcut includes a modification key, such as option or order, press the FN or modification button extended to the FN key. For example, to use control + F3 to put in the dock, press prolonged on the FN or control keys, then touch F3 in the Touch Bar.