


Share ONEDRIVE files and folders – Microsoft support, file sharing on a network in Windows – Microsoft support
![]()
File sharing on a network in Windows
Open the file explorer, then type \\ Localhost in the address bar.
Share ONEDRIVE files and folders
ONEDRIVE ENTREPRISE SUB -SUBOINT Server SharePoint Server 2019 SharePoint Server 2016 SharePoint Server 2013 Enterprise SharePoint in Microsoft 365 Office for Microsoft 365 ONEDRIVE (Work or School) businesses).com OneDrive (at home or staff) SharePoint in Microsoft 365 Small Plus Business. Less
The files on your onedrive remain private until you share them. Remember that when you share files with modifying the authorizations, the people with whom you share them can add the shared files to their own OneDrive. This allows them to keep the folder with their own files and elements, easily move items between the files and work more easily in the outset mode. The modifications they make are synchronized with the shared file so that anyone with access to the file is up to date.
- The recipient can add shared folders to its OneDrive space, not individual files. If you want the recipient to add files to his OneDrive, start by placing the files in a folder, then share the folder.
- To share files on SharePoint, see Share SharePointou files or folders Share documents or folders in SharePoint Server.
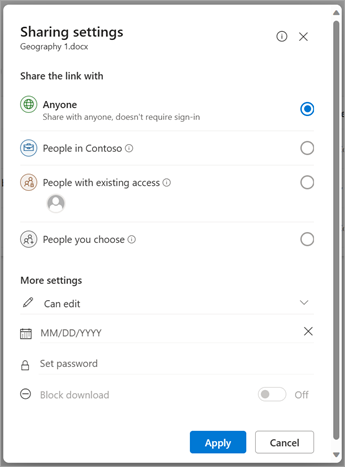
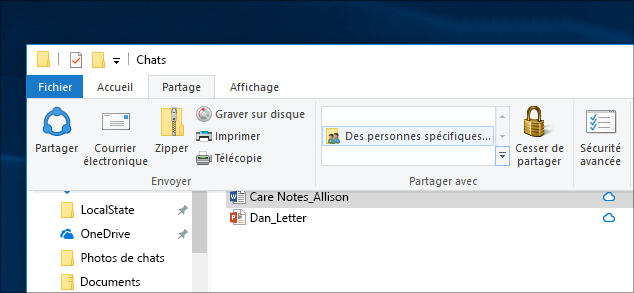
Share with specific people
Advice : Story of photos is a new part of OneDrive which facilitates the sharing of photos and videos with your friends and your family. Learn more.
Select this option if you want to send an electronic invitation to people or groups, and keep the guest trace. This also allows you to remove authorizations granted to individuals or specific groups, if necessary.
- Access the OneDrive website and connect with your Microsoft account or with your professional or school account.
- Select the files or folders to share by selecting your icon in the form of a circle.
Noticed : The simultaneous sharing of several elements is not available for OneDrive professional or school accounts.
- If you use the list display, select the circle on the left side of the item. You can also share several items at the same time.
- If you use the sticker display, select the circle in the upper right corner of the element. You can also share several items at the same time.
 .
.
- If the selected file or folder is already shared with a person, a list Shared with appears below. Each image is either the profile photo of an individual or the initials of a group with which the file was shared. If you want to modify the level of access of an individual or a group, select a photo or the initials of a group to open Manage access.
- If the selected file or folder is not currently shared with someone, there will be no Sharing with list.

Noticed : Depending on the parameters defined by the administrator, you can have different default settings. For example, this button can also say People in can modify.
If you use OneDrive for work or school, you can modify the link authorizations. Otherwise, ignore this step.
- Select an option for people you wish to grant access with the link:
Noticed : If a sharing option has been grayed, the administrators of your organization may have restricted them. For example, they can choose to deactivate the option EveryoneTo prevent the transfer of links that can be used to other people outside your organization.
- The option Everyone grants access to people who receive the link, whether they receive it directly from you or has been transferred by a third party. This may include people outside your organization.
- The option Members of the link Allows all the members of your organization who have the link to access the file, whether they receive it directly from you or that it has been transferred by a third party.
- The option People already having accesscan be used by people who already have access to the document or file. It does not modify the authorizations. Use this option if you just want to send a link to a person who already has access.
- The option Specific peoplegrants access to only people you specify, even if other people already have access to the element. If the sharing invitation is transferred, only people who already have access to the element will be able to use the link.
Noticed : Note that to follow access and ensure security, you can only share with a member that is part of your organization or who has a Microsoft account.
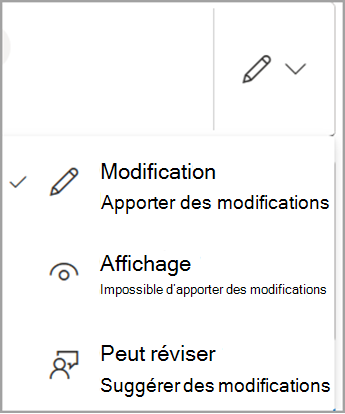
- Authorize the modification is activated by default.
- You can also define changes for modification on the previous screen. Below Link, opposite the field Name, group or email, Select the pencil icon to modify the modification authorizations for the people or the groups you have entered.
Noticed : This option is only available for professional or school accounts and if you Do not authorize the modification.
- Only Word Documents and Files have this authorization option.
- If a person already has modification authorizations for the element, selecting Open in revision mode only will not prevent them from making changes. For these, the document will open in publishing mode.
Advice : To quickly share information with specific people, you can type their name or mail address, then use the pencil icon to the right of the field Name, group or mail To select Can change Or Can display. Then follow the same procedure below to share with specific people included in your list. For Word Documents, you can use the option Can revise To allow someone to add comments and suggestions, while preventing them from making changes.
Noticed : If you want to write your message in Outlook, select the button Outlook To insert the link into a mail draft and the entry with whom you wish to share will appear in the list at.
- If you encounter sharing problems from Outlook.com, see the UNDERSTANCE section to share ONEDRIVE files from Outlook.com.
- If your Microsoft account is defined with parental control and your parent or tutor has disabled contacts management, you can only share elements with people already in your contact list.
- In any case, respect copyright and pay attention to the data you share online. The copy or sharing of unauthorized content is a violation of the Microsoft service contract.
Share using “copy the link”
Choose this option to share items with a large number of people you may not know personally. For example, you can use these links to publish them on Facebook, Twitter or LinkedIn, or share them in an email or a message. Anyone receiving the link can display or modify the item depending on the authorization you define. Users with the link cannot download the new elements. If the point of sharing ties to a folder, you may need to connect with a Microsoft account. You do not have any ?
Advice : You can generate sharing links via the OneDrive desktop application for Windows 7, Windows 10, Windows 11 and Mac. Just click right -click on the file or folder in your ONEDRIVE folder on your computer, then select Share Unonedrivelien. This allows you to copy a link to your clipboard that you can stick to where you want to send it. However, these links are defined by default for modification authorizations. If you want to change the authorizations, follow the steps below.
- Access the OneDrive website and connect with your Microsoft account or with your professional or school account.
- Select the files or folders to share by selecting your icon in the form of a circle.
Noticed : The simultaneous sharing of several elements is not available for OneDrive professional or school accounts.
- If you use the list display, select the circle on the left side of the item. You can also share several items at the same time.
- If you use the sticker display, select the circle in the upper right corner of the element. You can also share several items at the same time.
. - If the selected file or folder is already shared with a person, a list Shared with appears below. Each image is either the profile photo of an individual or the initials of a group with which the file was shared. If you want to modify the level of access of an individual or a group, select a photo or the initials of a group to open Manage access.
- If the selected file or folder is not currently shared with someone, there will be no Sharing with list.
Noticed : Depending on the parameters defined by the administrator, you can have different default settings. For example, this button can also say People in can modify.
To modify link authorizations, select settings ::
Noticed : If a sharing option has been grayed, the administrators of your organization may have restricted them. For example, they can choose to deactivate the option EveryoneTo prevent the transfer of links that can be used to other people outside your organization.
- The option Everyone grants access to people who receive the link, whether they receive it directly from you or has been transferred by a third party. This may include people outside your organization.
- The option Members of the link Allows all the members of your organization who have the link to access the file, whether they receive it directly from you or that it has been transferred by a third party.
- The option People already having accesscan be used by people who already have access to the document or file. It does not modify the authorizations. Use this option if you just want to send a link to a person who already has access.
- The option Specific peoplegrants access to only people you specify, even if other people already have access to the element. If the sharing invitation is transferred, only people who already have access to the element will be able to use the link.
Noticed : Note that to follow access and ensure security, you can only share with a member that is part of your organization or who has a Microsoft account.
- Authorize the modification is activated by default.
- You can also define changes for modification on the previous screen by selecting the pencil icon to the right of the names with which you share the file.
- Only Word documents/files have this authorization option.
- If a person already has modification authorizations for the element, selecting Open in revision mode only will not prevent them from making changes. For these, the document will open in publishing mode.
Noticed : “Https: // 1DRV.MS “is the shortened URL for OneDrive. Shortened URLs are practical for sharing via Twitter.
Sharing with OneDrive mobile applications
For more information and for help, see:
- Share files in OneDrive for Android
- Share files in OneDrive for iOS
- Share files in OneDrive for Windows mobile devices
Learn more
- See also Microsoft 365 advanced protection
- Impossible to share OneDrive files
You need additional help ?

Contact the support
To get help with your subscriptions and your Microsoft account, visit, account assistance and invoicing.
To obtain technical support, go to contact Microsoft support, enter your problem and select Help. If you still need help, selectContact customer assistance To be directed to the best customer assistance option.
File sharing on a network in Windows
Noticed : This article explains how to share files or folders on a local network (or LAN), that is to say on computers connected to your home or your place of work. If you try to discover how to share a file on the internet, for example with a friend or a family member, OneDrive offers simple ways to achieve it. For more information, see Share ONEDRIVE files and folders.
Here are some answers to current questions on the modifications made to the sharing of files and folders in Windows 11:
From now on, how to share files or folders on a network ?
To share a file or folder on a network in file explorer, proceed as follows:
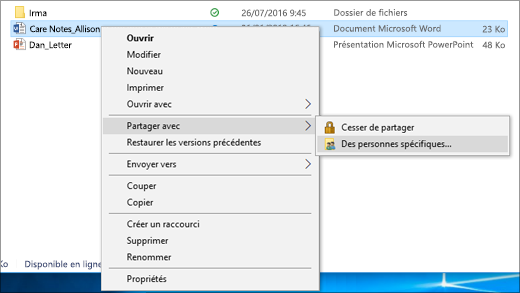
- Right -click (or press a file for a long time), then select Show other options >Give up >specific people.
- Select a user on the network with which to share the file, or select Everyone To allow all users of the network to access the file.
If you select several files at the same time, you can share them all in the same way. It also works for folders: if you share a folder, all files will be shared.
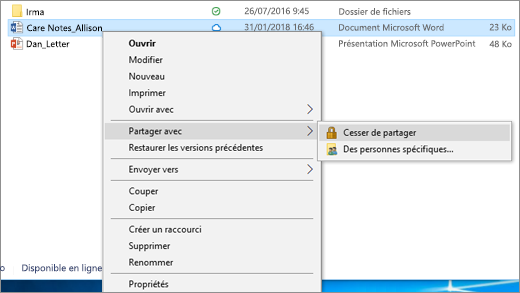
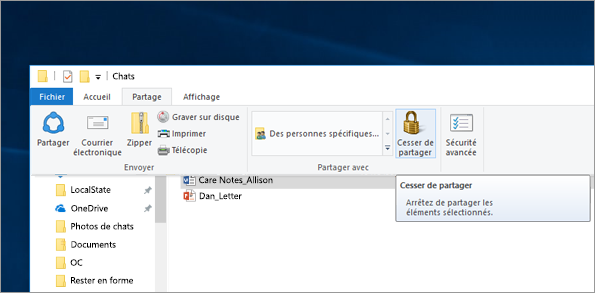
How to stop sharing files or folders ?
Right -click or press a file or folder, then select Show more options > Give up > Delete access.
Why “stop sharing” or “deleting access” is displayed in the file explorer for files that I have not shared ?
File explorer displays the option Delete access For all files, even those that are not shared on a network.
How to know which files or folders I shared on a network ?
Open the file explorer, then type \\ Localhost in the address bar.
Noticed : When you have shared a file from a folder in your user profile and access \\ Localhost, you see your user profile and all the files there. This does not mean that all your files are shared: just that you have access to all your own files.
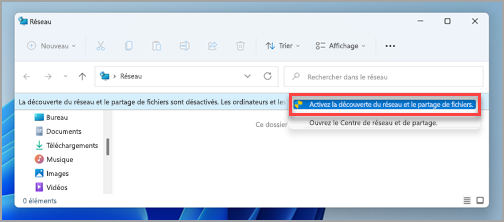
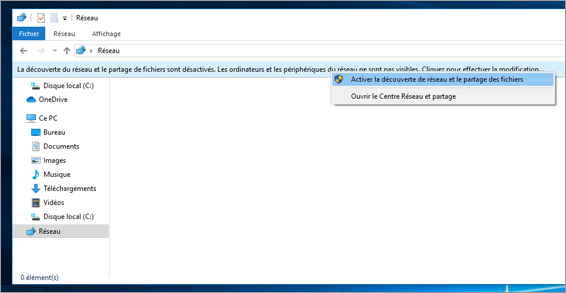
How to activate network discovery ?
If you open the file explorer, access NetworkAnd see an error message (“Discovery of the network is disabled. »), You must activate the discovery of the network to see the peripherals of the network that share files. To activate it, select the banner The discovery of the network is disabled, Then select Activate network discovery and file sharing.
How to solve file sharing or folder problems ?
To resolve file sharing or folder problems, follow the steps below on all computers from which you try to share.
- Update Windows It is essential to ensure that all machines are as up to date as possible so as not to miss the updates of pilots or windows.
Open Windows Update - Make sure computers are on the same network. For example, if your computers connect to the internet via a wireless router, make sure they all connect via the same wireless router.
- If you are on a Wi-Fi network, set its status to Private. To find out how to proceed, read a public or private Wi-Fi network in Windows.
- Activate network discovery and file sharing and printers, then deactivate password protected sharing.
- Select the button To start up , Then Settings .
- In the search bar Search for a parameter, tap Manage advanced sharing parameters and select Manage advanced sharing parameters in suggested results.
- In the window Advanced sharing settings which appears, under Private, select Activate the discovery of the network And Activate file sharing and printers.
- Below All networks, select Disable password protected sharing.
- Start sharing services automatically.
- Press the Windows logo key + R.
- In the dialog box Execute, tap services.MSC, Then select OK.
- Right -click on each of the following services, select Properties, If they are not running, select To start up, then, in view of Start -up type, select Automatic ::
- Host of the Function Discovery Supplier
- Publication of functions of functions
- SSDP discovery
- UPNP device host
Associated sections
- Share elements with devices located nearby in Windows
- Share files in the file explorer
- Make a Wi-Fi network public or private in Windows
- Solve network connection problems in Windows
In Windows 10, some file sharing and folder features on a network have been modified, in particular the deletion of the residential group. Read the answers to current questions on other modifications made to sharing files and folders in Windows 10.
From now on, how to share files or folders on a network ?
To share a file or folder in the file explorer, perform one of the following operations:
- Right -click or press a file, select Grant >Specific people.
Select a file, select the tab Share At the top of the file explorer, then in the section Share with, select Specific people.
Select a user on the network with which to share the file, or select Everyone To allow all users of the network to access the file.
If you select several files at the same time, you can share them all in the same way. It also works for folders: if you share a folder, all files will be shared.
How to stop sharing files or folders ?
To stop sharing a file or folder in the file explorer, perform one of the following operations:
- Right -click or press a file or folder, then select Grant >Delete access.
Select a file or folder, select the tab Share At the top of the file explorer, then in the section Share with, select Delete access.
Why “stop sharing” or “deleting access” is displayed in the file explorer for files that I have not shared ?
The file explorer displays the option Delete access (“Stop sharing” in previous versions of Windows 10) for all files, even those that are not shared on a network.
How to know which files or folders I shared on a network ?
Open the file explorer, then type \\ Localhost in the address bar.
Noticed : When you have shared a file from a folder in your user profile and access \\ Localhost, you see your user profile and all the files there. This does not mean that all your files are shared: just that you have access to all your own files.
How to activate network discovery ?
If you open the file explorer, access NetworkAnd see an error message (“Discovery of the network is disabled. »), You must activate the discovery of the network to see the peripherals of the network that share files. To activate it, select the banner The discovery of the network is disabled, Then select Activate network discovery and file sharing.
How to solve file sharing or folder problems ?
To resolve file sharing or folder problems, follow the steps below on all computers from which you try to share.
- Update Windows It is essential to ensure that all machines are as up to date as possible so as not to miss the updates of pilots or windows.
Open Windows Update - Make sure computers are on the same network. For example, if your computers connect to the internet via a wireless router, make sure they all connect via the same wireless router.
- If you are on a Wi-Fi network, set its status to Private. To find out how to proceed, read a public or private Wi-Fi network in Windows.
- Activate network discovery and file sharing and printers, then deactivate password protected sharing.
- Select the button To start up , Then Settings >Network and internet , then, on the right side, select Sharing options.
- Below Private, select Activate network discovery And Activate file sharing and printers.
- Below All networks, select Disable password protected sharing.
- Start sharing services automatically.
- Press the Windows logo key + R.
- In the dialog box Execute, tap services.MSC, Then select OK.
- Right -click on each of the following services, select Properties, If they are not running, select To start up, then, in view of Start -up type, select Automatic ::
- Host of the Function Discovery Supplier
- Publication of functions of functions
- SSDP discovery
- UPNP device host
Associated sections
- Share elements with devices located nearby in Windows
- Share files in the file explorer
- Make a Wi-Fi network public or private in Windows
- Solve network connection problems in Windows