


Craft and straighten photos in photos on Mac-Apple Assistance (CA), Corel Photo-Paint Help | Refer
![]()
Referring
1 Click on border coloring image .
Reframe and straighten photos in photos on mac

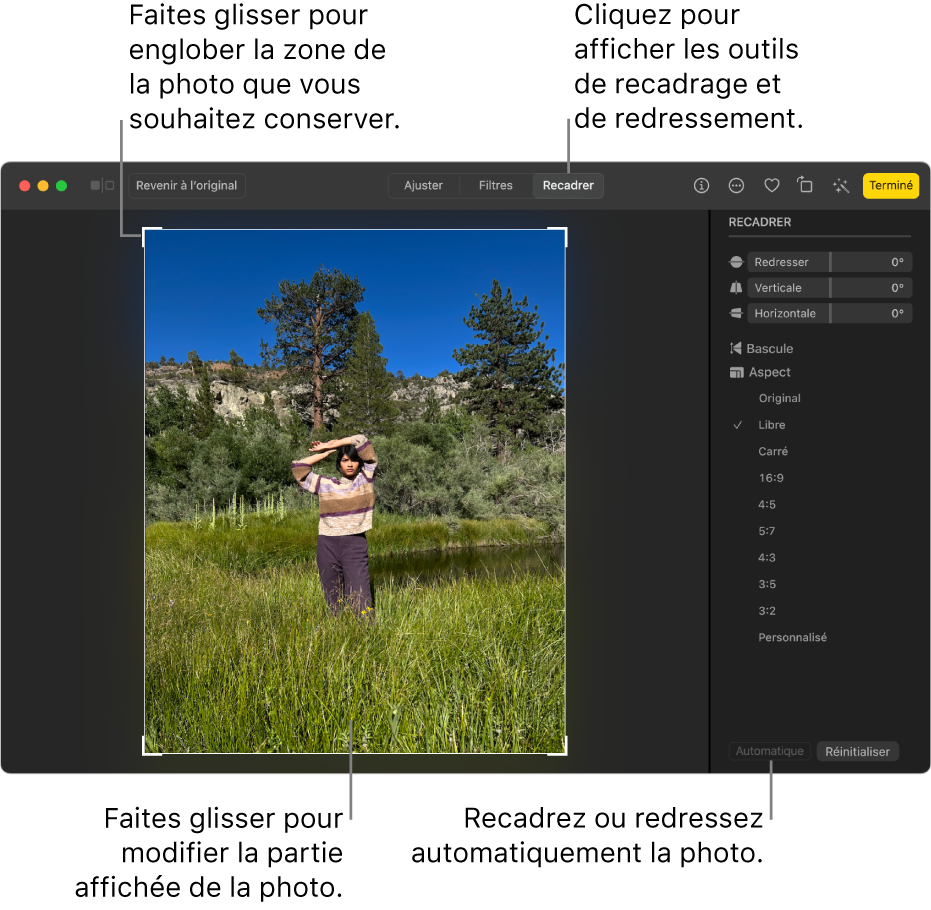
You can refer a photo to improve its composition or to eliminate unwanted parts of the image. You can crop the photo according to a preset or a personalized proportion, or you can be satisfied with its original proportions. You can also straighten out photos taken, unwittingly, slightly bias.
Noticed : You can also refer and straighten the videos. Consult the Modify and Improve a video section.
Important : When a photo is cropped, the modification appears everywhere in photos, including in albums, slideshow and projects. To modify a photo without these changes apply to all existing copies, start by duplicating the photo, then modify the copy.
- In the photo app on your mac, double-click the photo, then click edit in the toolbar.
- Click Recadrer in the toolbar.
Trick : To quickly display reframing and recovery tools in edition mode, press the C key.
- To crop or straighten the photo automatically: Click on Auto.
- To refer to manually: Slide the selection rectangle to encompass the desired area.
- To crop to specific proportions: Click on the proportions of your choice in the sidebar. For example, for a square photo, choose Carré. To print the photo, choose one of the predefined proportions, like 8 x 10. To size a photo in order to use it in a high definition video, choose 16 x 9. Otherwise, choose customize to enter a personalized proportion for a photo.
- To return the image: Click on turn back to turn the image horizontally. Click by holding the Option key to turn the image vertically.
- To straighten the image: Slide the storm slides, vertical or horizontal to adjust the angle of the photo.
- To delete the current cropping or recovery: Click on Reset.
- To save your modifications: Click on finished.
- To stop the crop without saving your modifications: Click back to the original.
Referring
You can refer an image to remove the superfluous areas and improve its composition. You can select a rectangular zone to keep and delete the rest of the image. You thus reduce the size of the image file without affecting its resolution .
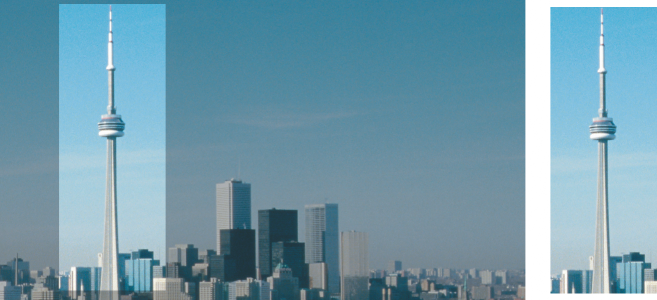
Reframing makes it possible to remove the areas from an image that does not interest you.
It is also possible to easily crop a monochrome border surrounding an image, such as the white edge surrounding an old photograph.
Corel Photo-Paint also allows you to make a reframing around the modifiable area of a mask . Note, however, that the image obtained is always rectangular. For more information on masks, see the mask section.
You can also change the size of an image without adding areas, or deleting, but changing its dimensions and resolution . For more information, see the dimensions section of an image, resolution and paper format.
To crop an image
1 Click on the RéCadrer tool .
2 Drag the mouse to select an image area.
3 Click twice inside the crop area.
You can also
Enlarge or reduce the crop area
Slide the crop handles.
Move the crop area
Click in the crop area and slide the mouse to reposition the crop area.
Pivot the crop area to straighten it
Click inside the crop area to display rotation handles . Slide the rotation handles to align the reframing area on the image zone to be cropped.
Enlarge the cropping zone beyond the original image
Click on referral image Develop the crop area, then slide a reframing handle out of the image.
Change the resolution of the crop area
Choose a value in the reframe resolution area of the Properties bar.
This parameter allows you to define a new resolution for the crop image. For example, you can reframe a high quality photo to the desired size and modify its resolution to obtain 96 ppi so that the crop image is ready for the web.
Change the orientation of the crop area
Click on the Modify orientation button of the Property Bar.
You can hide the cropping of cropping in order to better visualize the image during cropping. To do this, click on Image Cradient Cradge Covering .
You can also refer an image area. To do this, click on the cropping tool and enter values in the size and position of the properties bar.
To crop a border color from an image
1 Click on border coloring image .
2 Activate one of the following options:

• Background: allows you to crop the specified color in the secondary color sample in the color control area of the toolbox.

• Premier: allows you to crop the specified color in the main color sample in the color control area of the toolbox.
• Other: allows you to crop the color chosen using the color selector or the pipette tool .
3 In the tolerance area, activate one of the following options:
• Normal: makes it possible to determine color tolerance according to the similarity of shade values between adjacent pixels.
• TSL mode: makes it possible to determine color tolerance according to the similarity of the levels of shade, saturation and brightness between adjacent pixels.
4 Move the tolerance cursor to adjust color tolerance to crop.
You may have to try several positions for the tolerance cursor before successfully deleting the border color.
To crop a modifiable area of a mask
1 Define a modifiable area in an image.
2 Click on image reframe a picture on the mask .
For more information on the definition of modifiable zones, see the Define Modifiable Zones section.
Some functions presented in the aid are available only for subscribers. For more information on the Coreldraw subscription, visit the Coreldraw site.com.