


Rogen an image in Office – Microsoft support, crop and cut an online image → Convertible
![]()
Refer an online image
Contents
- 1 Refer an online image
- 1.1 Cut an image in Office
- 1.2 Refer an online image
- 1.3 More online photo tools
- 1.3.0.1 RotationTo rotate
- 1.3.0.2 CropCrop
- 1.3.0.3 MirrorSymmetry
- 1.3.0.4 Reduce
- 1.3.0.5 Create 8 identity photos
- 1.3.0.6 Lighten/compress photo in jpeg
- 1.3.0.7 Superimpose a watermark text
- 1.3.0.8 Inch a logoWatermark tattoo
- 1.3.0.9 Photo inBlack White
- 1.3.0.10 Photo inSepia shade
- 1.3.0.11 Digital paintingMaster’s picture
- 1.3.0.12 TV screenRetro television
- 1.3.0.13 Pop Art Andy Warhol effect
- 1.3.0.14 Poster discoSPOT
- 1.3.0.15 SketchPencil drawing
- 1.3.0.16 3D imageStereoscopic
- 1.3.0.17 Create a favicon.ICO
- 1.3.0.18 Change the image format
- 1.4 Convertimage knows how to open all your images .
- 1.5 . and resize them quickly !
- 1.6 . or save them quickly to all the following formats:
- 1.7 Your privacy is precious: we respect it.
Convertible is the fastest site for crop and crop your online photos (select an image portion) ! Free online refinging and searches !
Cut an image in Office
Excel for Microsoft 365 Word for Microsoft 365 Outlook for Microsoft 365 PowerPoint for Microsoft 365 Office Customer Project Online Excel for Microsoft 365 for Mac Word for Microsoft 365 for Mac PowerPoint for Microsoft 365 for Mac Word for Web PowerPoint Web Excel 2021 Word 2021 Outlook 2021 PowerPoint 2021 Project Professional 2021 Project Standard 2021 Excel 2021 for Mac Word 2021 for Mac PowerPoint 2021 for Mac Excel 2019 Word Word Word Outlook 2019 PowerPoint 2019 Project Professional 2019 Project Standard 2019 Excel 2019 For Mac Word 2019 2019 for Mac Excel 2016 Word 2016 Outlook 2016 PowerPoint 2016 Project Professional 2016 Project Standard 2016 Excel 2016 for Mac Excel 2013 Word 2013 Outlook 2013 PowerPoint 2013 Project Professional 2013 Project Standard 2013 Excel 2010 Word 2010 Outlook 2010 PowerPoint 2010More. Less
Crush an image to cut the external edges which are superfluous.
- If you prefer to delete the background from an image, see the background deleted from an image.
- If you want enlarge or enlarge an image, See modifying the size of an image.
Important : Rogcerated parts of the image are not deleted from the file and can be visible by other people. including search engines if the rogated image is published online. If there is sensitive information in the area that you grow, be sure to delete the cropped areas (see below), then save the file.
In addition to the basic margini scoring, you can cut images in order to obtain specific shapes and proportions, and cut off filler (in Microsoft 365 for Mac and in Office 2010 and subsequent versions).
Office can you help with the basic modification of images as illustrated in the video above, but for more advanced tasks, you may need a dedicated image editing application. The digital trends application recommends free photo editing software.
Cut the margins of an image
- Use L‘> Image to add the image to an Office file (for example, a word document, a PowerPoint Presentation or an Excel Classify).
- Right -click on the image. A drop-down menu is displayed with two buttons immediately above or below the menu. Roger is one of the buttons.
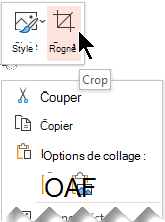
- Select it button Crop. Black knife handles appear on the edges and corners of the image.
- Crush the image by performing one of the following operations:
Description Action Sneak Slide the side of side scrolling into the inside Cut two adjacent sides at the same time Slide inside the side handle handle on the side handle Equally cut two parallel sides at the same time Maintain the CTRL key pressed while sliding the side of side scrolling to the inside You can also extend or add a margin around an image by sliding the scruffing handles to the outside rather than inside.
- (Optional) To reposition the scoring area, modify it by dragging the edges or corners of the cropping rectangle, or move the image.
- When you have finished, press escape or click anywhere in the document, apart from the image.
Noticed : The scoring tools are not available for forms. In Office 2010 and subsequent versions, you can however resize a form and use the tool Change points To obtain an effect similar to cropping, or personalize a form. For more information, see modifying points to modify or Roger the form.
Run a form, such as a circle
Other types of cropping
Select a title below to open the corresponding section and see the detailed instructions.
Crush on common proportions
Sneak an image to adapt it to a photo size or proportions allows you to easily insert it in a standard setting. You can also use this tool to display a preview of the image proportions before selecting.
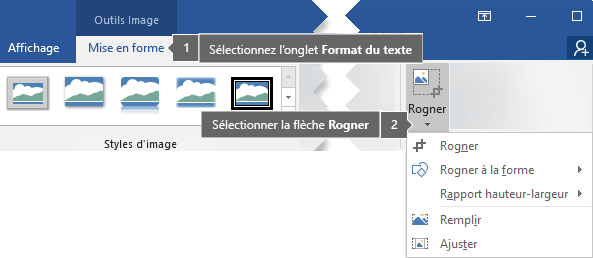
- Click on Insertion >Picture To add the image to an office file (for example, a Word document, a PowerPoint presentation or an Excel workbook).
- Click on the image.
- Click on Image tools >Format, Then in the group Size, Click on the arrow under Crop.
- In the menu appearing, select Height-width ratio, Then click on the report of your choice. A scrape rectangle appears to show you what the image will look like when rooged the selected proportions.
- You can also adjust the scoring area using scoring handles, as described in scoring an image.
- When you have finished, press escape or click anywhere in the document, apart from the image.
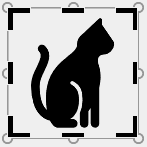
Crop to adjust to a shape or fill it
Cut an image without using Office
Paint applications (in several versions of Windows) and 3D paint (in Windows 10) allow you to cut an image. Open your image in the application to reveal a button Crop in the toolbar. Look at this view of the presentation of certain features in the 3D paint application.
Delete the scoring areas of an image
By default, once you cut an image, the cropped areas are still part of the file, but are not hidden. However, you can reduce the size of the file by deleting the Rogcerated Zones of the Image File. This also prevents other users from seeing the parts you have deleted from the image.
Important : If you delete the cropped areas and change your mind afterwards, you can click on the button Cancel for restore them. Deletions can be canceled until the file is saved.
To delete the rugged areas of the image file:
- Select the images (s) you want to delete cropped areas.
- Click on Image tools >Shaping. In the group Adjust, click on Compress the images. A dialog box offering different compression options is displayed.
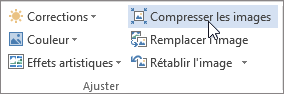 If the tabs Image tools And Shaping do not appear, check that you have selected a picture. You may have to double-click the image to select it and open the tab Shaping. Furthermore, if your screen is small, only the icon Compress the images can appear.
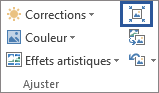
- Below Compression options, Check that the box Remove images scoring areas is checked.
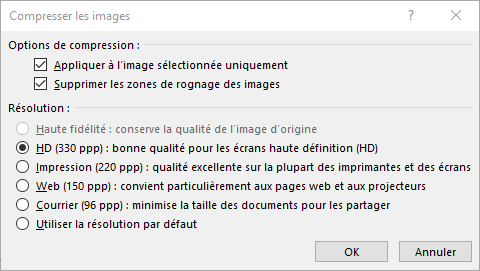 To delete scrapes from the selected images only and not all the images of the file, check the box Apply to the selected image only. If necessary, select a option to resolution.
 - Click on OK.
Advice : For more information on reducing image file size and image compression, see reducing the file size of an image.
See as well
Cut the margins of an image
- Use L‘> Images to add the image to an Office file (for example, a word document, a PowerPoint Presentation or an Excel classify).
- Click on the image, then on The format tab Image in the toolbar tape.
- Below The format tab of the image, select Roger. Black knife handles appear on the edges and corners of the image.
- Rognie the image by dragging the handle handle inwards. If you slide one of the corner handles, it is modified in two adjacent sides at the same time.
- Click outside the image to see the cut image.
Noticed : Once you have cut off an image, the rugged parts are hidden but remain in the image file. To permanently delete the rogated part and reduce the size of your image, see the section below on this page called Delete Rogce -up areas from an image.
Crop to a specific form
Delete the scoring areas of an image
By default, even after cutting out parts of an image, the cropped parts remain in the image file. However, you can reduce file size by deleting the image files. This also prevents other users from seeing the parts you have deleted from the image.
Important : The removal of the cropped areas of an image cannot be canceled. This is why you should only use it after being sure you have made all the rogages and the desired modifications.
To delete crops from an image file:

- Select the images (s) you want to delete cropped areas.
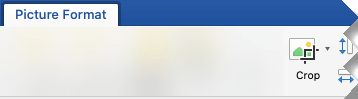
- Below The image format tab , click On compress images. (If you don’t see the tabImage tools, Check that you have selected an image.))
- Select the check box Remove images scoring areas. To delete scrapes from the selected images only and not all the images of the file, select Images selected only.
See as well
In Word for the web and PowerPoint for the web you can cut a basic image, which allows you to cut the unwanted margins of an image. However, only desktop applications can delete arranged image areas.
Cut an image
- Select the image in Roger.
- In the ribbon, select the tab Picture.
- Select the pointing arrow down in
 ‘option Roger, then Select Roger. Black crop crop handles appear on the edges of the image.
 - With the mouse, point to a gripped handle, then click and slide inward to cut the image margin.
- When you have finished from Roger the margins, click apart from the image limit to save changes.
Important : Rogcerated parts of the image are not deleted from the file and can be visible by other people. including search engines if the rogated image is published online. Only desktops can delete crops from the underlying image file.
Refer an online image

Reclassing an online image rotation framing and size [all] – [all] convertible convertible
More online photo tools

Rotation
To rotate

Crop
Crop

Mirror
Symmetry

Reduce

Create 8 identity photos

Lighten/compress photo in jpeg

Superimpose a watermark text

Inch a logo
Watermark tattoo

Photo in
Black White

Photo in
Sepia shade

Digital painting
Master’s picture

TV screen
Retro television

Pop Art Andy Warhol effect
![]()
Poster disco
SPOT

Sketch
Pencil drawing

3D image
Stereoscopic

Create a favicon.ICO
Change the image format

Convertible is the fastest site for crop and crop your online photos (select an image portion) ! Free online refinging and searches !
THE online photo crop (or crop) is very fast and consists in cutting your image on the edges you want. This prevents you from installing image processing software. Thanks to Our online cropper, You can easily change The size of your photos professional and personal photos, without software.
With the multiplication of sites and blogs, the web design without CMS can become tedious. Converting will reappear your photo Coming from an image bank (purchased with rights) so that it adapts to your WordPress, Joomla, Blogger, Skyblog CMS and of course your professional website, thanks to the High quality of treatment convertible crop.
![]()
Recede all your photos and images on converting !
Convertimage knows how to open all your images .
. and resize them quickly !
![]()
. or save them quickly to all the following formats:
Your preferences relating to your personal data
Note: Your preferences will be applied from the next page that you will visit/load.
Your privacy is precious: we respect it.
By using this site, you accept that we used technologies such as anonymous statistics and cookies to improve your browsing experience on our site, personalize content and advertising, and analyze our traffic.
This anonymous information can be shared with our social media, advertising and trust analysis partners.
- We do not collect any nominative data.
- Your files are treated 100% anonymously.
- We do not keep any file: they are deleted from our servers 15 minutes after their treatment.
Preference cookie (compulsory) Define…
This cookie is necessary to remember your preferences. No data concerning you is used.
Use (compulsory)
Site basic functions (compulsory) Define…
This cookie is necessary to allow the key functionalities of the site and is automatically activated when you use it. No data concerning you is used.
Use (compulsory)
Social sharing tools Define…
Allows you to offer you social sharing tools on the pages of the site (ex. Facebook “Like” button). You will need to voluntarily click on a sharing button so that the page is shared on your favorite social network. No sharing will be made automatically.
More precise ads Define…
The announcements offered on the site are more relevant to you through the use of information on your device as well as your geographic location calculated automatically. Anonymous data is shared with these announcements of ads. No nomitative data is used.
Witnesses & Cookies Define…
The use of cookies on this site allows you to improve your online experience, guarantee its proper functioning, improve its features, allow us to follow our traffic, and provide you with relevant announcements. You can customize or deactivate them completely, but we will unfortunately not be able to guarantee you optimal operation of the site.
ATTENTION ! You have chosen to completely deactivate all cookies. This is your right, but we will unfortunately not be able to guarantee you the optimal operation of the site.