


Retouch a photo to correct defects and stains in photos on Mac – Apple assistance (CH), how to touch up a photo in a few clicks – Tutorial & Tips
![]()
How to touch up your photos in a few clicks? Development, black & white, red eyes, blurred ..
Contents
- 1 How to touch up your photos in a few clicks? Development, black & white, red eyes, blurred ..
- 1.1 Retouch a photo to correct defects and stains in photos on mac
- 1.2 How to touch up your photos in a few clicks ? Development, black & white, red eyes, blurred ..
- 1.3 Retouch your photos: basic cursors to be resolved during development
- 1.4 Photo retouching: black & white and filters for more style
- 1.5 Delete a defect in a photo: retouching the red eyes and using the buffer tool
- 1.6 Give depth or movement to your photos: Try blurring games !
- 1.7 Retouch
- 1.8 Adjust the brightness, contrast or sharpness
- 1.9 Apply artistic effects
- 1.10 Change the color
- 1.11 Apply image effects
- 1.12 Add a border
- 1.13 Delete the background
- 1.14 Compress the image
Refine the features of a portrait thanks to a higher contrast and an oriented light.
Retouch a photo to correct defects and stains in photos on mac

You can delete stains, dust grains and other small defects in a photo.
Noticed : You cannot touch up a video using photo editing tools. Consult the Modify and Improve a video section.
- In the photo app On your Mac, twice click on the photo, then click Modify in the toolbar.
- Click Adjust in the toolbar.
- In the sub-fencing adjust, click on the arrow
 looking back.
 - Slide the size cursor to select a brush size. After dragging the cursor to select the size of the brush, you can modify it by pressing the left ([) and right (]) hooks) .
- Place the brush above the defect, then click on it or drag the brush to erase it. If the defect is too small and does not fade from the first attempt, try to enlarge the photo to make more precise changes.
Trick : If you do not get the expected results, you can copy pixels in another part of the photo and apply them to the defect. Press the Option key while clicking on an area that has the desired texture, then apply the modification using the retouching tool. Click on the image while holding the control key, then choose “Erase the source of manual retouching” to stop copying the pixels in the area.
How to touch up your photos in a few clicks ? Development, black & white, red eyes, blurred ..
How to touch your photos quickly ? Poorly framed, too dark, too yellow ? Your photos have faults ? You would like them to reflect more emotions, whether they are more aesthetic or creative ?
In this article, we give you four tips (with tutorial) to retouch and quickly sublimate your photos:
- Develop your photos: basic settings
- Styling your photos: blacks & white and filters
- Remove defects: red eyes and the use of the buffer tool
- Give depth or movement to your shots: play with the blurs
Before we start, here are 3 tips to have in mind:
- Save your original photos and remember to work on copies of your images ! We are often happy to find our original photos to be able to apply new effects.
- Readade your images From the start if necessary, to zoom or change the angle of view. Please note: it is preferable for this to choose a balanced ratio and think of the printing format !
- Practice and do not hesitate to search the web. Many tutorials allow you to make your photo touch -ups quickly.
If this article presents some basic photo retouching, it is far from exhaustive ! According to the photo editing software you use, the possibilities vary.
Free tools for your photo | incorporate

![]()
![]()

- Retouch your photos: basic cursors to be resolved during development
- Adjust the scale, temperature and colors:
- Set tone, brightness and contrast:
- Convert a photo to black & white
- Apply a filter to your photo
- Correct red eyes
- Make an element
- The depth of field
- Movement
Retouch your photos: basic cursors to be resolved during development
We are talking about development for everything related to The first processing of an image, Namely the adjustment of basic settings: exhibition, white balance, colors, contrast, tone, etc.
For this, photo retouching software all offer you a series of cursors to be adjusted, in the “Image” (Photoshop) or “Development” (Lightroom) tab or “Colors” (GIMP) and “Adjustment” (Photofilter).
Adjust the scale, temperature and colors:
The dominant color of your image is directly linked to the ambient lighting of the shooting. Artificial lighting, for example, will give a dominant red-orange and a hot atmosphere.
The white balance or the color balance make it possible to alleviate a color too present.
The idea is to restore the colors of your photo a certain neutrality. Using sliders, you can navigate between hot (red, orange) or cold tones (blue, green, purple) and thus adjust the temperature of your photo.
Take advantage of great promotions on our site !

The tab Hunting/saturation Also allows you to compensate for a dominant color, with an adjustment palette of cold tones and hot tones.
Set tone, brightness and contrast:
Functions colors, Automatic tone and contrast exist in many software, but beware the result is not always the one desired ! It is best to adjust these variables using the corresponding sliders.
Set it tone of an image amounts to working its bright values. This can go through the adjustment of several cursors including the tone curve, exhibition, brightness and contrasts. Playing with the tones curve and/or modifying the exhibition can make it possible to catch up with a counter-day, an image too light or too dark. The luminosity and contrast adjustment then helps to restore depth to your image.
To develop your photos, it is therefore a question of combining a set of variables. If you have any doubts, test the sliders in both directions and use the live preview ! If necessary you can always go back (Ctrl Z / Apple Z / History).
Some ideas ?
Intensify a nice landscape with a higher contrast to detach the reliefs and a colder tone to bring out the blue from the sky and/or a lake.
Refine the features of a portrait thanks to a higher contrast and an oriented light.
Make a warm family photo by adjusting its tone to warmer colors.
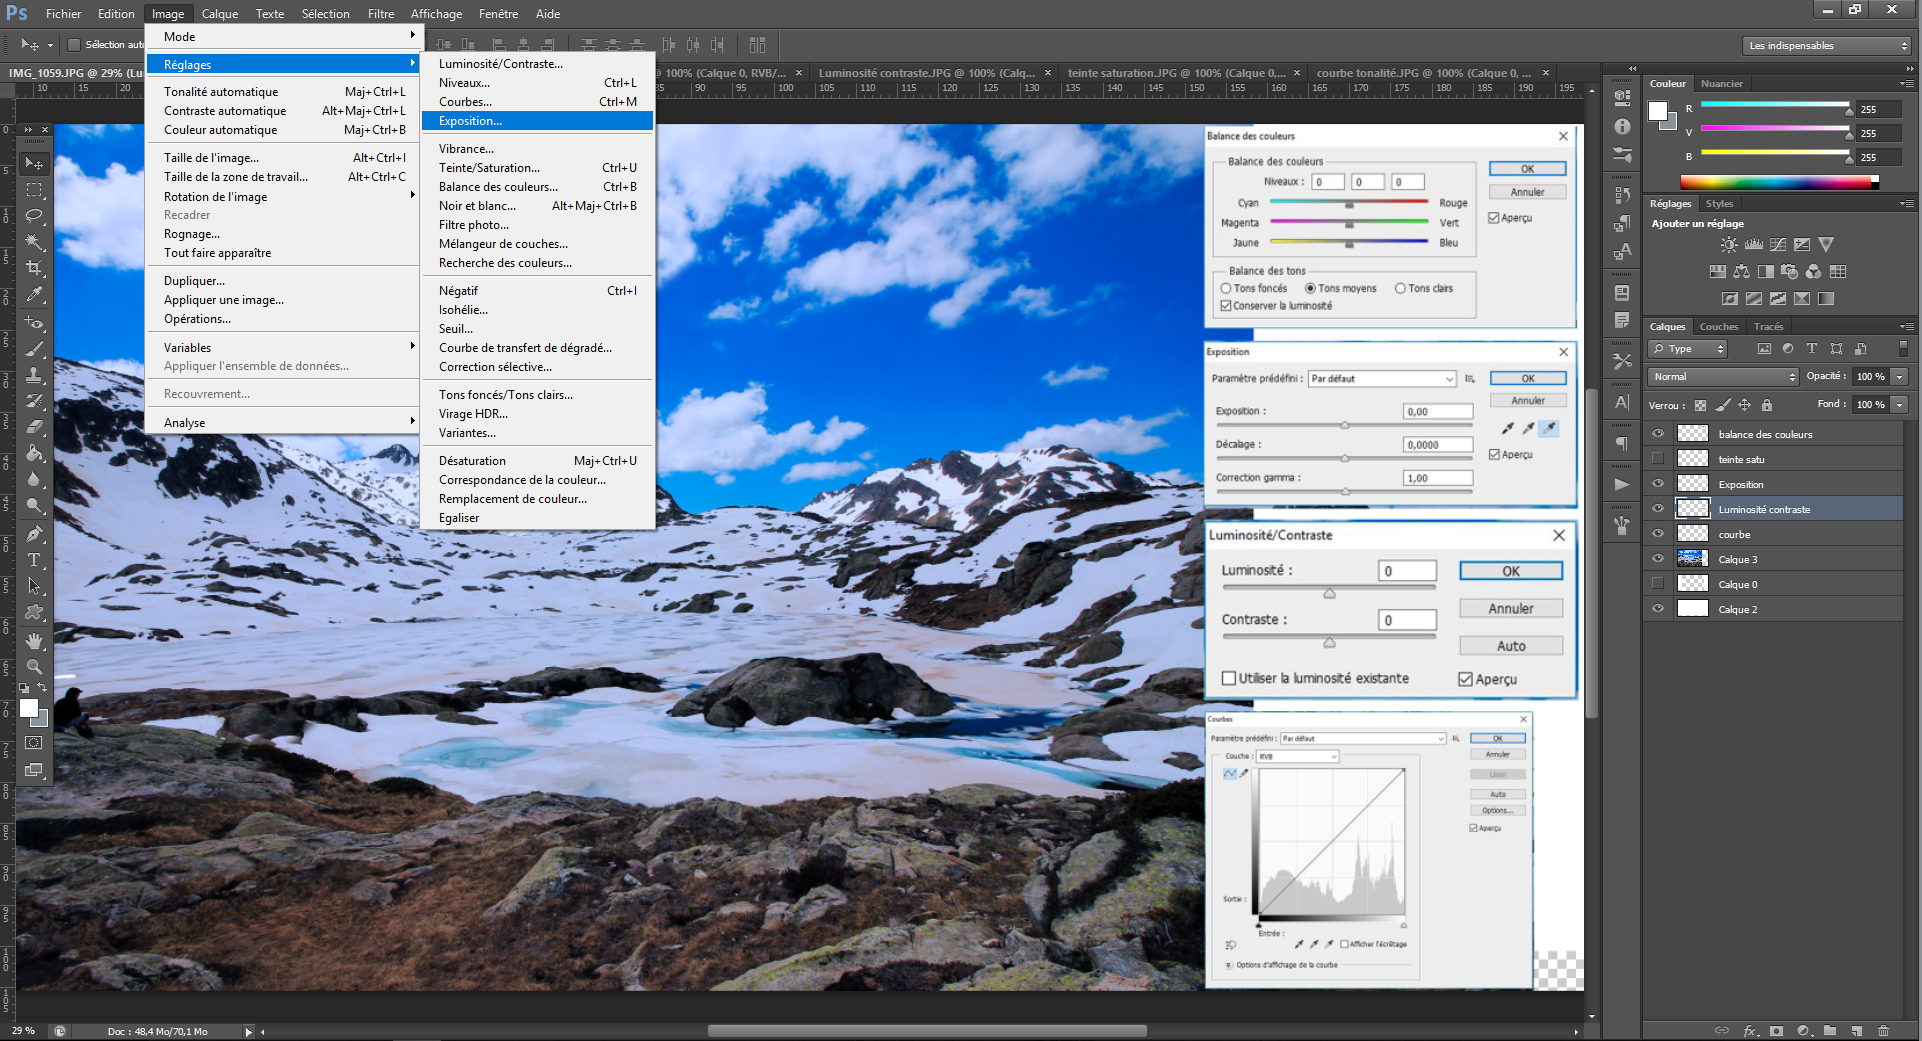
Photo retouching: black & white and filters for more style
After the development of your photo, you can go further by giving it an atmosphere or a certain cachet.
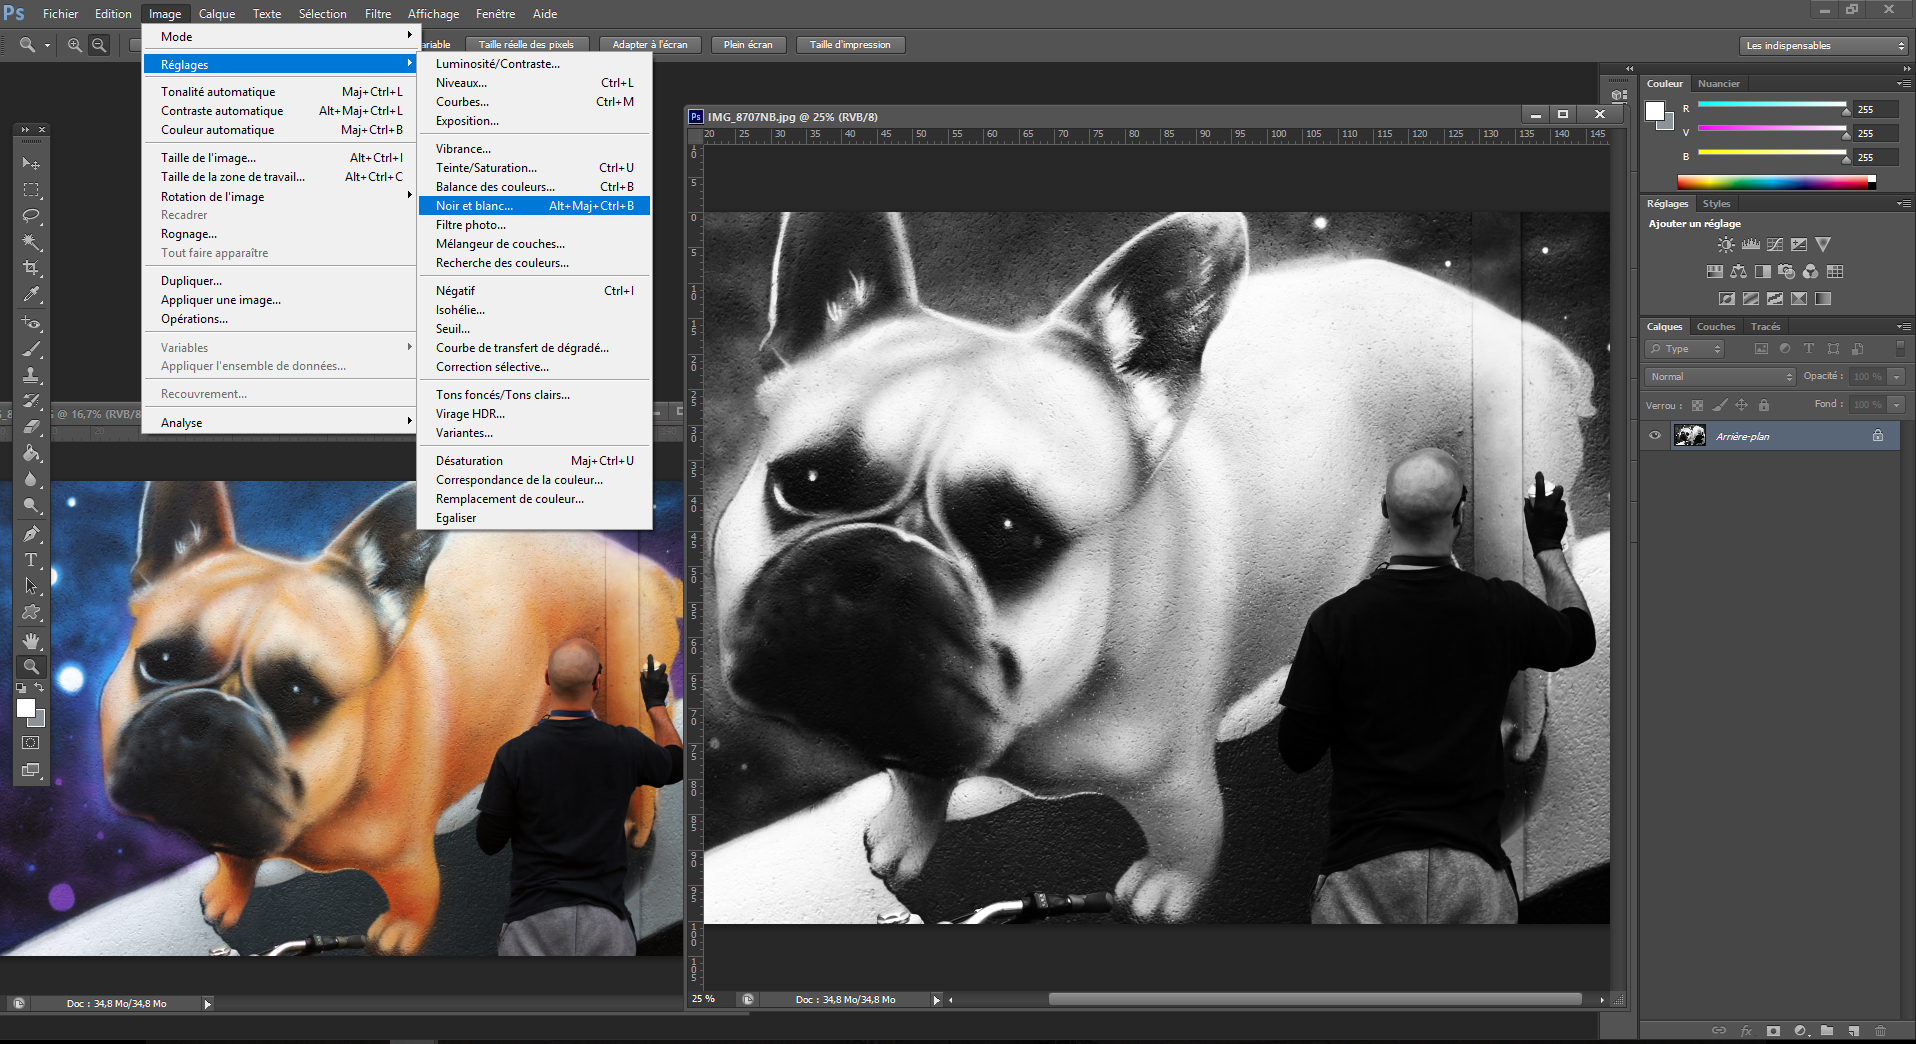
Convert a photo to black & white
The passage in black and white of a photo is possible in all photo editing software. You will find this option in the “Image” tab (Photoshop, Gimp) or “Development” (Lightroom).
The conversion of a black and white photo requires being supplemented by basic settings, some of which mentioned above: adjustment of tone, brightness and contrasts in particular. Temperature, colors and shades tabs will also have an effect on black & white but this remains relative, difficult to control and not very useful.
Some ideas ?
Pass an urban photo in black & white, adjust your brightness and intensify your contrast to create a real aesthetic “city scene”.
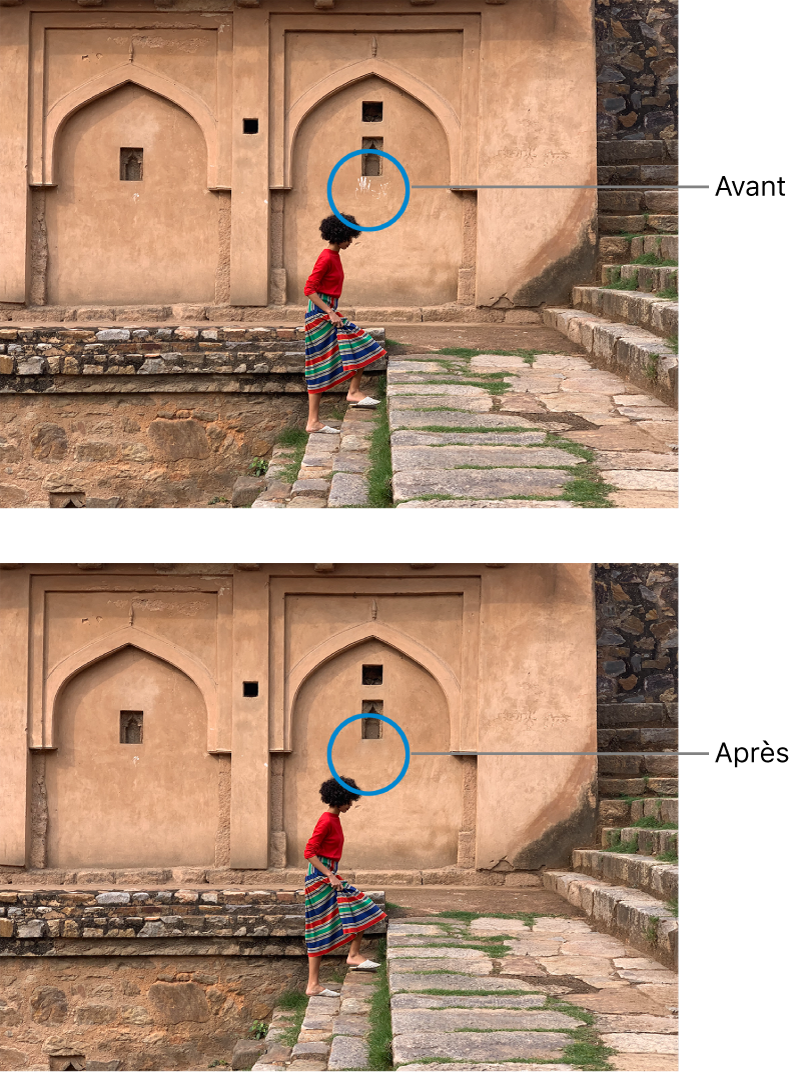
Reframe a portrait, convert it into black and white, intensify its contrast and why not the background vagueness (see. lower): emotions will be there.
You can test many combinations, black & white has always been a full -fledged photographic practice. Well done, it will give an artistic and intense aspect to your shots.
Apply a filter to your photo
Software all offers photo filters that allow you to quickly give your picture a tone.
For example, you can apply a Temperature photo filter to your photo: warming, cooling, sepia or directly linked to a dominant color. A warming filter will support a warm atmosphere, conversely, a cooling filter will intensify a winter cold, a sepia filter for it will give an aged effect, etc.
Software also offers you a gallery of artistic filters modifying the colors or the texture of your photos (paint, glow, grain, etc.)).
For the most sharp, you can play with the layers and the merger under Photoshop or Gimp. This allows you for example to give a Studio atmosphere Or a vintage effect with an image in a few steps. For this internet is full of free tutorials, to your keyboards !
Delete a defect in a photo: retouching the red eyes and using the buffer tool
From redundant to the disappearance of a person, you can touch your photos by playing the magicians.
Correct red eyes
For red eyes, no problem, the majority of photo editing software offers you a special correction tool. We find the “Red eye tool” (Photoshop> Toolbar> Direct tones corrector), “Redeyes” (Photofilter> Filter) or “Deletion of red eyes” (Gimp> Filters> Improvements).
An advice ?
Erase red eyes is good, to avoid them is better ! In short, the red eyes are due to the reflection of the light of the flash in the eye. To avoid them you can: limit the use of the flash, diffuse the light from the flash by covering it with a diffuser, a piece of fabric or a white paper, or finally keep the flash away from the lens so that it does not come Directly hit the eye by following the objective of the lens (which requires an external flash). By the way, anti -red eyes modes only change the problem without eliminating it.
Make an element
Photo retouching software allow you to go further and make annoying elements disappear: a panel, a cloud, a person, etc. For this they offer a tool ” buffer ” -” Duplication buffer “(Photoshop),” Cloning buffer “(GIMP) – which allows you to subtly hide areas of your photo. It gives the possibility of painting part of your image using as a basic palette another part of the latter.
Concretely, you take the buffer tool, you define a sampling point on the area you want to clone (Alt Clic), then stamp the area you want to hide in several times (simple single clicks). A word of advice: zoom zoom !

Give depth or movement to your photos: Try blurring games !
Photo retouching software offers you a whole panel of blurring to transform your photos, it is mainly found under the “Filters” tab.
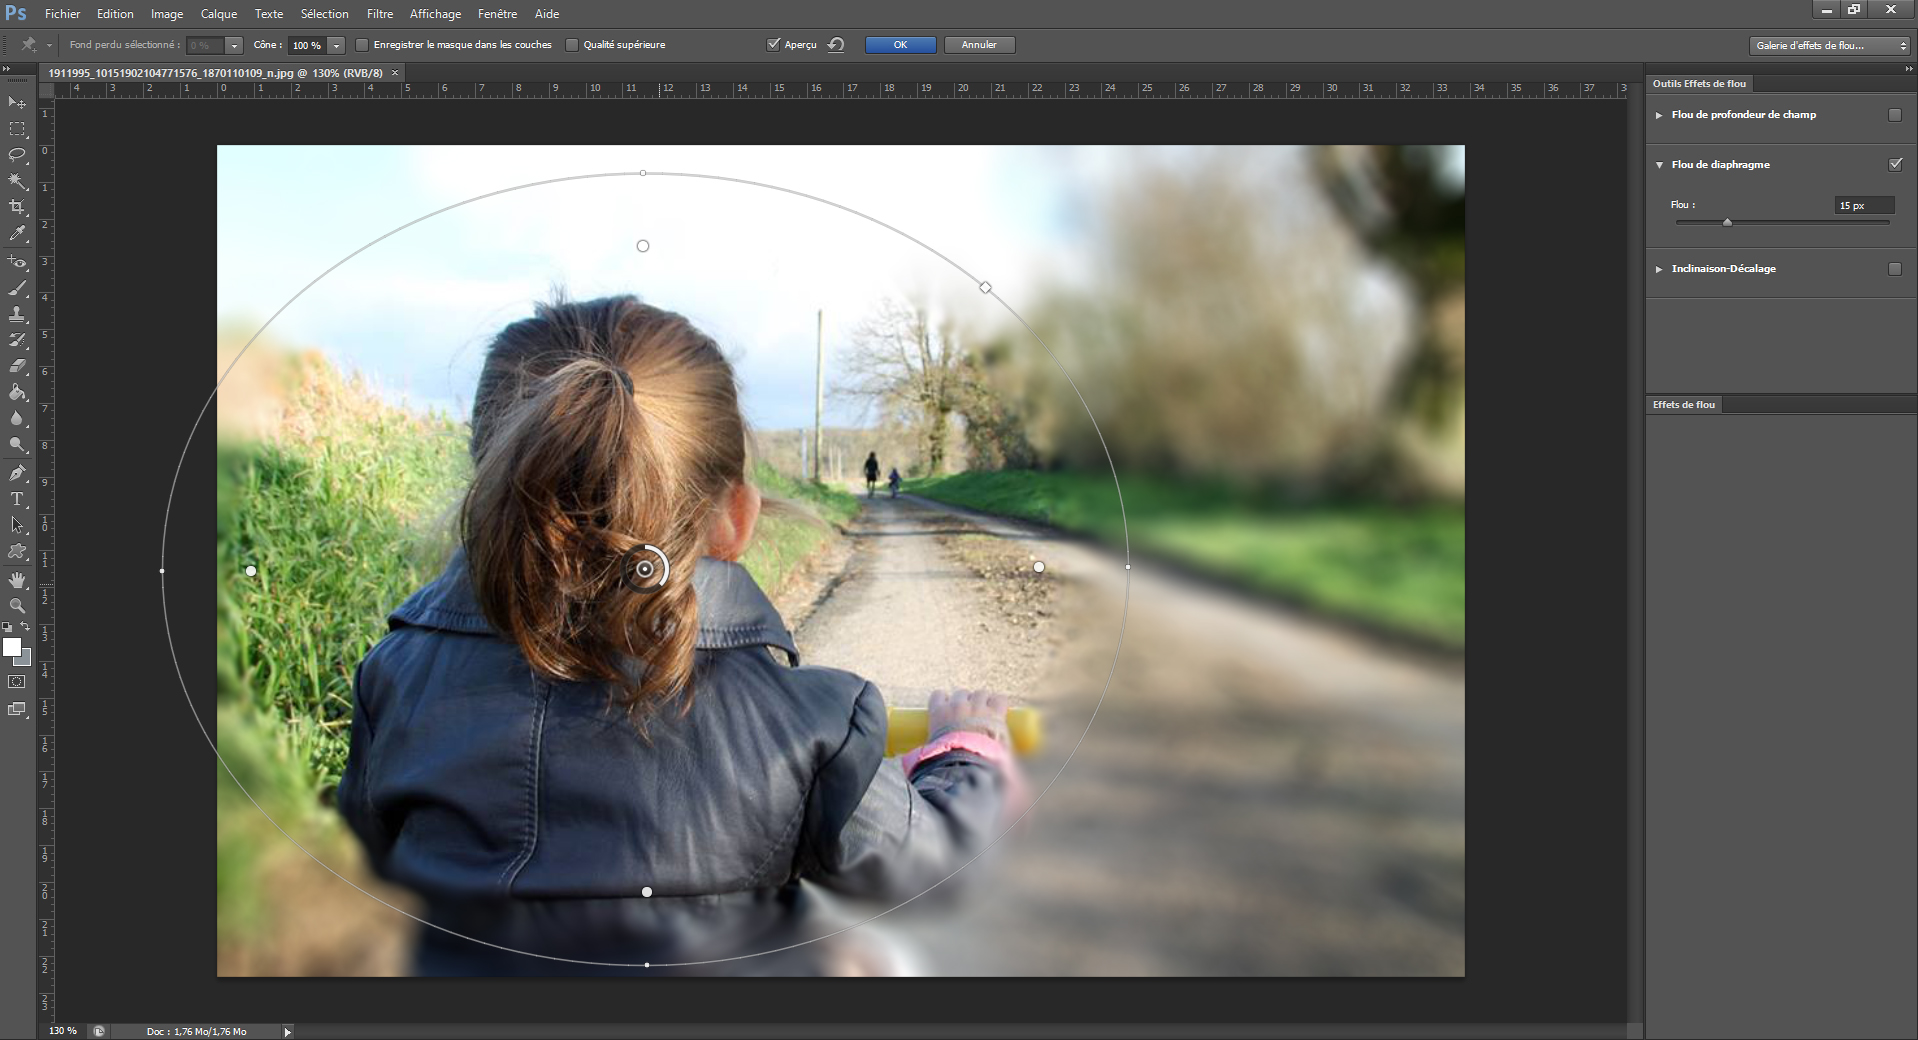
The depth of field
To play with the field depth you can use the function ” diaphragm ” Or ” Fuzz of field depth »(Photoshop> Filter> Attenuation),« Gaussian blur »(Gimp> filter> blur).
This tool takes the form of an surrounded pin. This is to be positioned in the area you want to clear, the rest becomes blurred. You can adjust the intensity of the blur thanks to the circle surrounding the pin or the effect bar located on the right. If you want to keep other areas of the net image, click on it to make a second pin appear !
Movement
You can create an impression of movement or speed thanks to motion blur, Present function in the majority of photo retouching software.
You choose the angle according to the direction you want to give to the movement. The distance will rule the intensity of the blur.
As with all touch -ups, check the preview live to properly dose your effect.
There are many photo touch -ups or effects to test ! You can for example compose a surreal image from several … but we will deal with this subject later;)
In the meantime, it’s up to you ! Touch your photos before printing them to decorate your interior for example. Discover some ideas for photo decor.
Your photo on large format
Retouch
After adding a photo, a graphic or an image to your slide, you have many ways to improve it, like artistic effects (blur, radiance, etc.); predefined styles that include border and shade; and colored and brightness/contrast settings.
65 seconds
Adjust the brightness, contrast or sharpness
1. Select the image.
2. Select Formatimage And Corrections.
3. Point on the options to display an overview, then select the one you want.
Apply artistic effects
1. Select the image.
2. Select Formatimage And Artistic effects.
3. Point on the options to display them in preversion, then select the one desired.
Noticed : You can only apply one artistic effect both to an image. Thus, the application of a new artistic effect removes the current artistic effect.
Change the color
1. Select the image.
2. Select Formatimage And Color.
3. Point on the options to display them in preversion, then select the one desired.
Apply image effects
1. Select the image.
2. Select Formatimage And Image effects.
3. Click on the desired option: Shadow, Reflection, Light, Softened contours, Bevel Or 3D rotation.
Add a border
1. Select the image.
2. Select Formatimage > image border, Then select a border.
Delete the background
Compress the image
1. Select the image.
2. Select Image format, Then Compress the images.
3. Select the desired options, then select OK.