


Pilot wire thermostat: to manage at the near degree any electric radiator* – DORTA DORE, tutorials and manuals – Domooting its electric radiators with pilot wire
![]()
Domoticizing its electric radiators with pilot wires
Contents
- 1 Domoticizing its electric radiators with pilot wires
- 1.1 Pilot wire thermostat: to manage at the near degree any electric radiator*
- 1.2 How does the Delta Dore pilot wire thermostat work ?
- 1.3 How to install the pilot wire thermostat and its receiver ?
- 1.4 What are the complementary solutions to the pilot wire thermostat to always enhance your offers ?
- 1.5 Domoticizing its electric radiators with pilot wires
- 1.6 Order modes (eco, comfort, etc.) thermostats integrated into the radiators
- 1.7 Order the temperature to the nearest degree (with a thermostat)
- 1.7.1 Set up thermostatic regulation using a connected thermostat
- 1.7.2 Hysteresis regulation
- 1.7.3 PID regulation
- 1.7.4 In conclusion
- 1.7.5 TO KNOW MORE
- 1.7.6 Set up a virtual thermostat on the box or home automation software
- 1.7.7 Example with an eemomus+
- 1.7.8 Example with Jeedom
- 1.7.9 Which temperature probe to choose ?
On Jeedom, you can use the official thermostat plugin (€ 8). As often, the approach is more complete and more customizable but also a little more complex than what is found on Eemomus.
Pilot wire thermostat: to manage at the near degree any electric radiator*
The pilot wire thermostat allows you to connect any electric wire electric radiator, and to be controlled remotely once associated with the Delta Dore connected home box. You offer a professional, fast, scalable and Made in France quality solution. Your customers save energy by programming their heating, while keeping their comfort by regulating the near degree. All this, without having to replace all of their electric radiators.
*Electric radiator equipped with a pilot wire
Opt for the pro Made in France solution: a universal offer,
eco-responsible and connected !
How does the Delta Dore pilot wire thermostat work ?
A universal solution
The pilot wire thermostat works With any electric wire electric radiator: of any brand and in all rooms in the accommodation.
You offer a complete offer to meet the needs of your customers, thanks to additional compatible products.
Did you know ?
- 70 million : this is the number of electric radiators identified (1)
- 3.5 million : this is the number of electric radiators sold each year (2)
- 190,000 : this is the number of accommodation equipped with electric heating renovated each year (3)
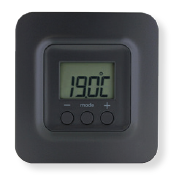
The pilot wire receiver is also compatible with the Tybox Black mood !
(1) GIFAM Infographic 2021, (2) Ademe, key figures 2013, (3) Estimate from data from the TREMI 2020 survey by ADEME and SDES
How to install the pilot wire thermostat and its receiver ?
Installation
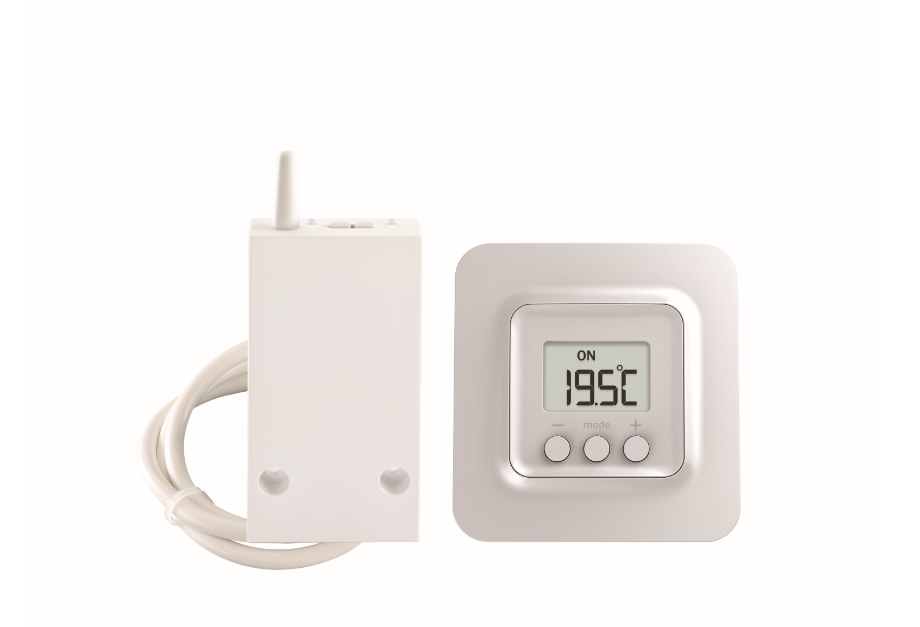
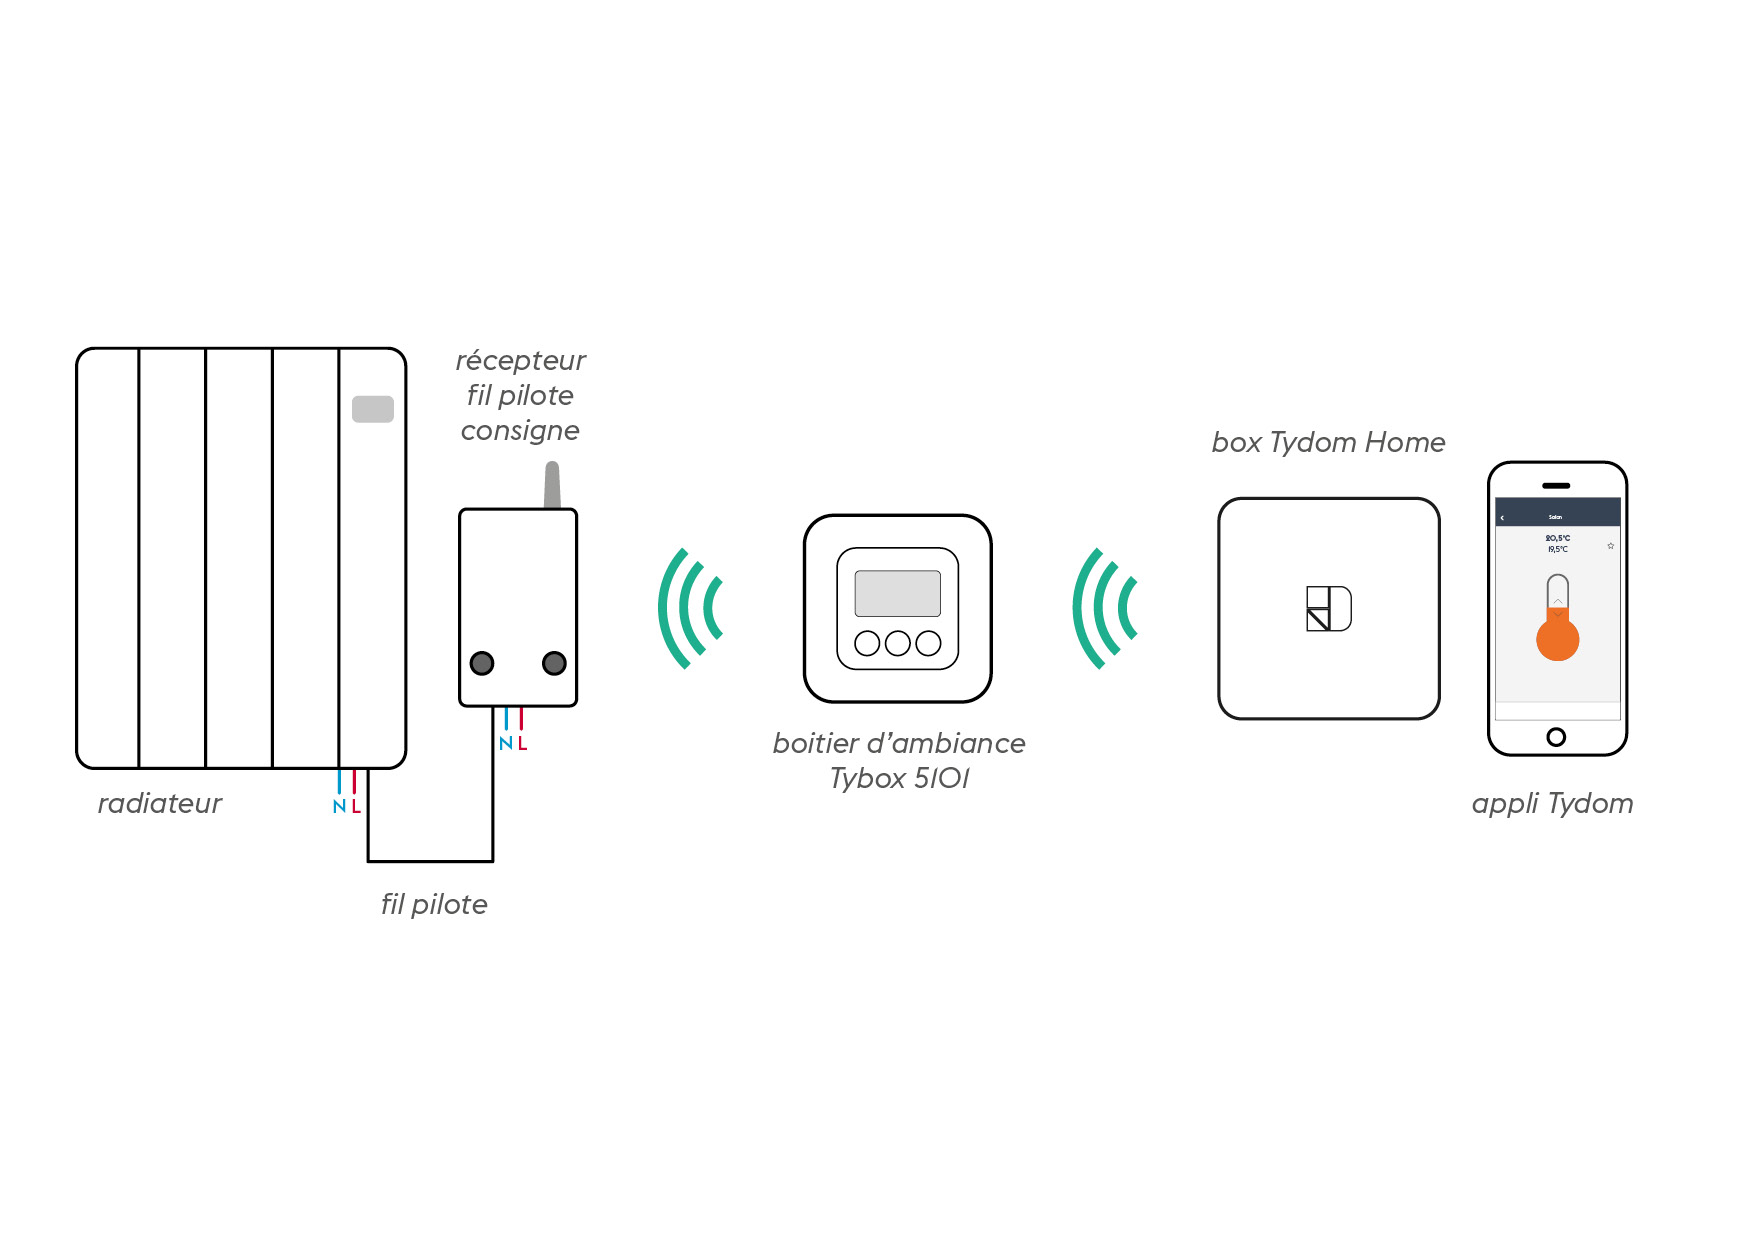
The pilot wire receiver Instructions is Associated with the mood Tybox 5101 which takes part of the room. Also connected to the electric radiator via the pilot wire (black wire), The pilot wire receiver sends on / off orders to reach the temperature setpoint. It can work with or without the solution of the Delta Dore connected home box.
What is the installation time ?
Easy and quick to install, The pilot wire thermostat is a turnkey solution ! Discreet, its receiver is fixed behind the electric radiator. Its atmosphere box can be placed anywhere, on a wall or a table, in the heart of the living space for an optimal temperature intake.
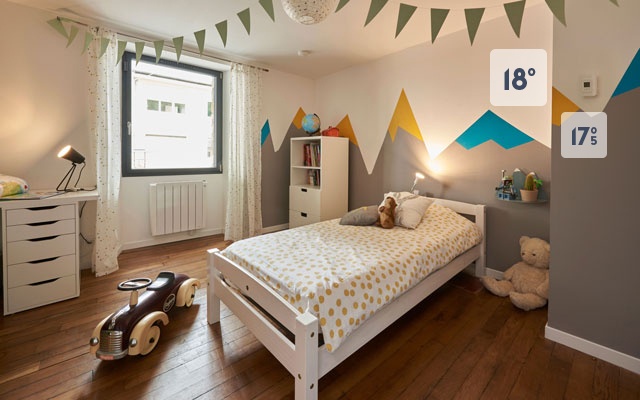
With its high precision regulation, your customers take control of their heating by controlling it at 0.5 degree near.
What are the possible configurations ?
In centralized or multizone management, multiple configurations are possible to respond to all the requests of your customers:
With a single thermostat, you can manage up to 16 receivers (as many radiators) ! Several receivers can be associated on the same Tybox 5101 for centralized management.
With a thermostat (Tybox 5101) in each room, which takes the ambient temperature, offer individualized regulation of heating.
The pilot wire receiver, associated with the thermostat of the same room, receives even more precise information in order to take control of the radiator and regulate it with efficiency !
With 2 thermostats in a accommodation, you can create a night area, an area day or more !


What are the complementary solutions to the pilot wire thermostat to always enhance your offers ?
Additional solutions
Offer your customers more, go beyond their initial needs:
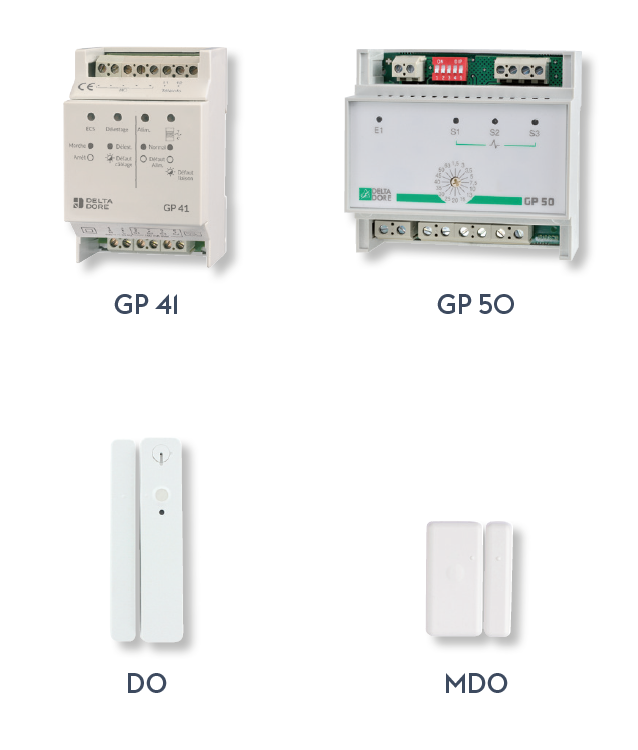
- GP 41 or GP 50 loads, make it possible to prevent power cuts, and to avoid taking a more expensive subscription than it should be.
- Delta Dore opening detectors, allow you to cut the radiator (s) in the event of a window opening detection, and to avoid unnecessary expenses.
A turnkey solution for your customers: faced with the challenge of energy sobriety and the importance of eco -gestes, offer your customers to save energy easily, in one click !
A connected solution
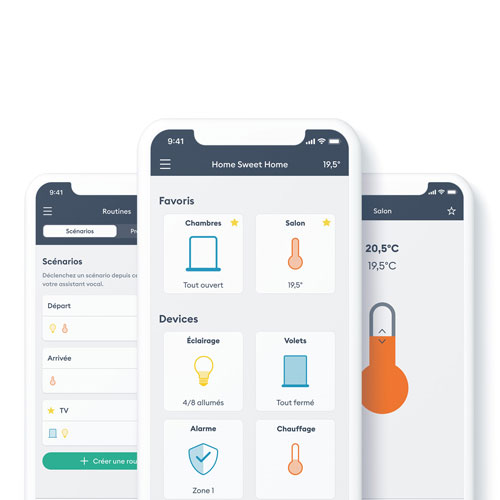
With the Tydom app, your customers can control their heating and pilot it to the near degree, when they want, from where they want, whether it be in voice or via routines ! So many possibilities to simplify their daily life.
The + for your customers:
- Pilot their electric radiator in instructions and with precision at the near degree
- Manage, centralize and program via routines each electric radiator equipped with a receiver
- Make real energy savings, while keeping their comfort at home.
What solutions for other types of heating ?
Hydraulic heating, electric or sheathing, we have solutions* to centralize, via the Tydom Home or Pro box, the management of heating of the same accommodation
*which cover a majority of market heating equipment.
 Domoticizing its electric radiators with pilot wires
In this tutorial, we will present different solutions to Domoticizing its electric radiators equipped with pilot wires and therefore to be able to order them by smartphone, from home or from a distance as well as in voice with a vocal assistant as Amazon Alexa, Google Home Or Siri d ‘Apple (via Homekit))
- If your radiator only has red (or brown) and blue (therefore, black wireless) or black and blue threads (but no red or brown), it probably does not have pilot wire. If you are in this case, we recommend that you consult our tutorial “Domoitize a pilot wireless electric heating”
- If your radiator has a black thread (which can be connected or not to be), in addition to a red or brown wire (phase), a blue wire (neutral) and possibly a wire (yellow and green), your radiator is most likely equipped with a pilot wire. This is this case that we will deal with below.
- Order the modes of a radiator with pilot wire
- Order the temperature to the nearest degree
- with a connected thermostat
- With the “virtual thermostat” function of your box or home automation software
Order modes (eco, comfort, etc.) thermostats integrated into the radiators
The simplest and easiest solution to implement, management by pilot wire allows you to order thermostats integrated from radiators equipped by activating one of the following modes via an electrical signal:
Fashion Effect on set temperature Compatible radiators 4 orders 6 orders Comfort Temperature set to the radiator thermostat Comfort -1 Temperature set to the radiator thermostat -1 ° C Comfort -2 Temperature set to the radiator thermostat -2 ° C Eco Temperature set to the radiator thermostat -3.5 ° C 1 Freezing 7 ° C Stop / merchants Total stop (whatever the temperature in the room) 1 On some electric radiators, the temperature of the eco mode can be a little lower or slightly higher, see being configurable.
Order a Pilot wire radiator With a home automation box or software
If you already have an advanced home automation system (Eedomus+, Jeedom, Homey, Home Assistant, Domotics, etc.) or if you have to order with the same system your heating, your roller shutters, your lighting, your safety, etc., The best solution is to opt for a system integrable to the demotic system possessed/desired.
If your home automation system manages the Z-Wave protocol, we recommend that you opt for “pilot wire” modules, more than qubino. Note that if your system does not manage the Z-Wave, it is undoubtedly possible to add this protocol to it via a simple USB dongle (from 25 €.)).
There are 2 models of Qubino pilot wire modules:
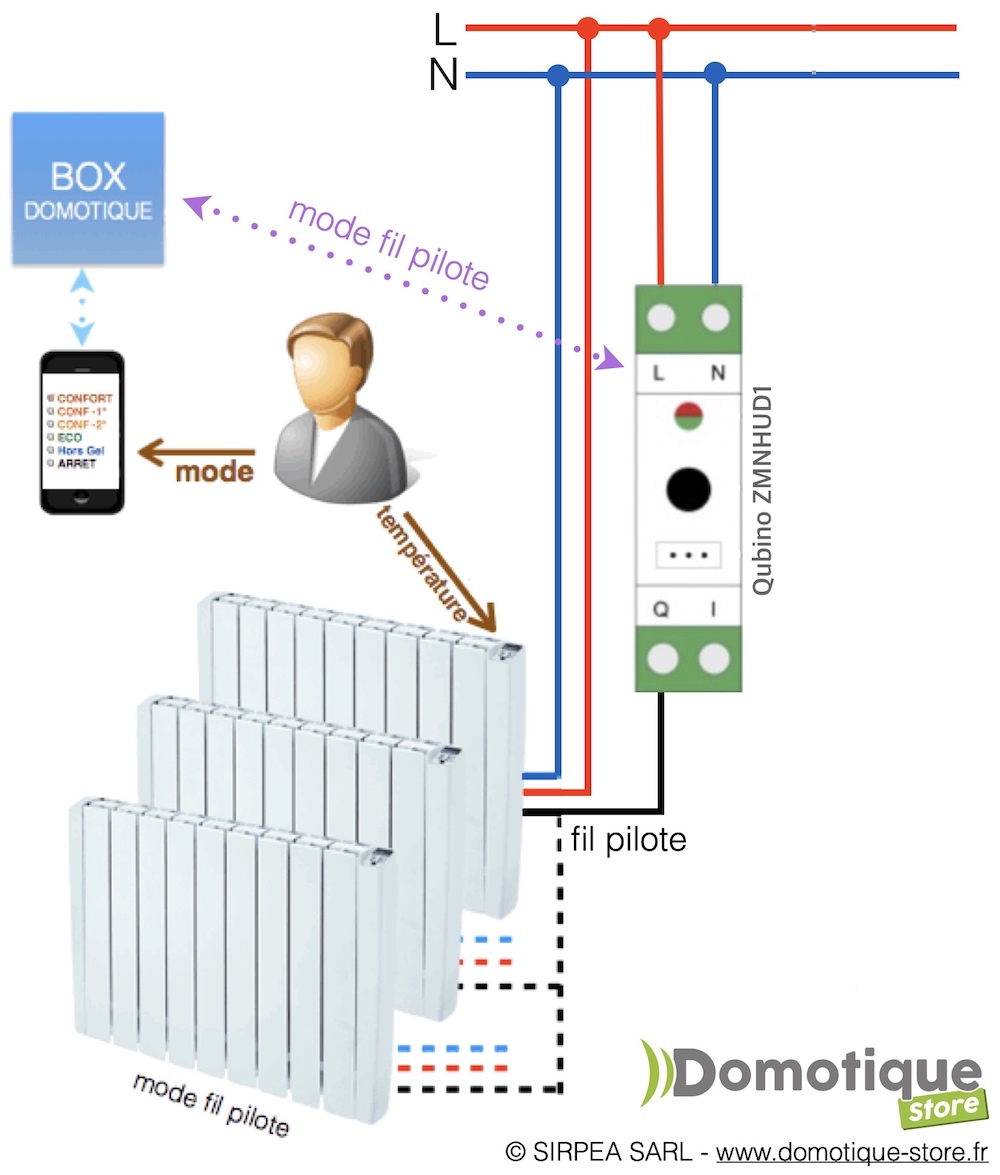
- In “DIN” rail format, to be installed on the electrical panel: Qubino ZMNHUD1
- In micromodule format, to be installed behind or next to your electric radiator: Qubino ZMNHJD1
Several cases are possible:
- If the pilot wires of your radiators are connected to your electrical panel, the use of the model in DIN format (ZMNHUD1) will undoubtedly be more suitable.
- If you have A pilot wire by radiator , You can either
- Connecting a different Din Qubino Zmnhud1 Din Module to manage each radiator individually.
- Group certain wires together and connect them to the same qubino zmnhud1 in order to send identical orders to all the radiators of the same group.
If your home automation system is not compatible with the Qubino pilot wire modules
- If you want to manage 4 or 6 orders and that your system supports the protocol Enocean , You can consider the micromodule pilot wire Enocean Nodon Sin-2-FP-01 that you can also install in an electrical panel thanks to an DIN DIN DIN V2 for NODON micromodules.
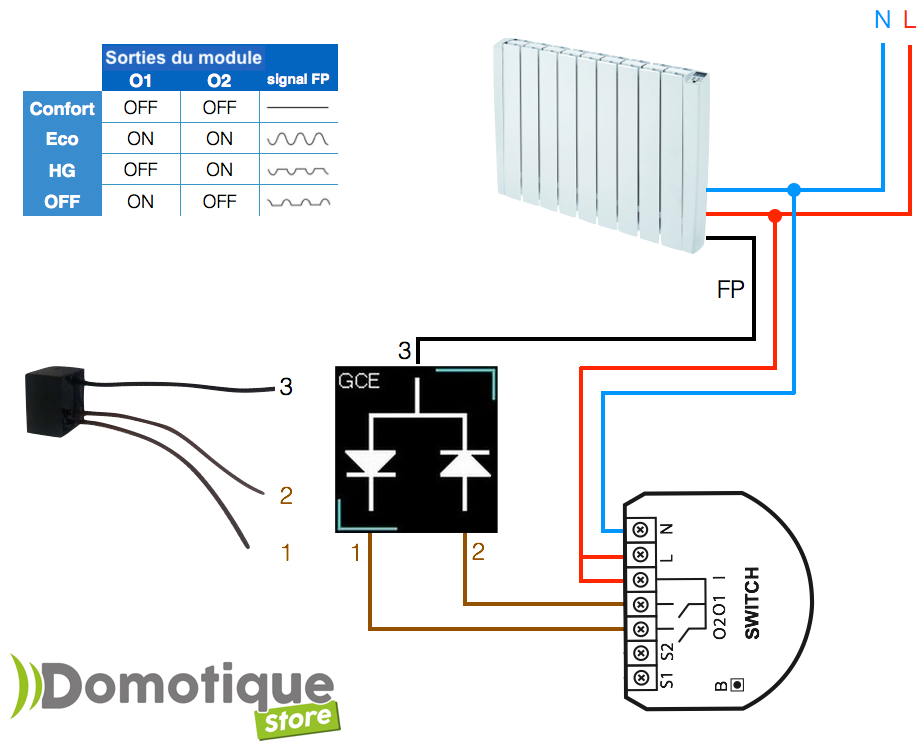
- If you want to manage 4 orders : You can go through an actuator module ( Z-Wave, ZigBee or Enocean ) to two outings like the fibaro fgs224 in Z-Wave Plus, the nodon sin-4-2-20 in zigbee or the nodon sin-2-2-01 in Enoceanen connecting its two outings to the double diode for pilot wire GCE “Mini FP”.
By activating the exits of the module according to the four possible combinations, you can produce the four main orders.
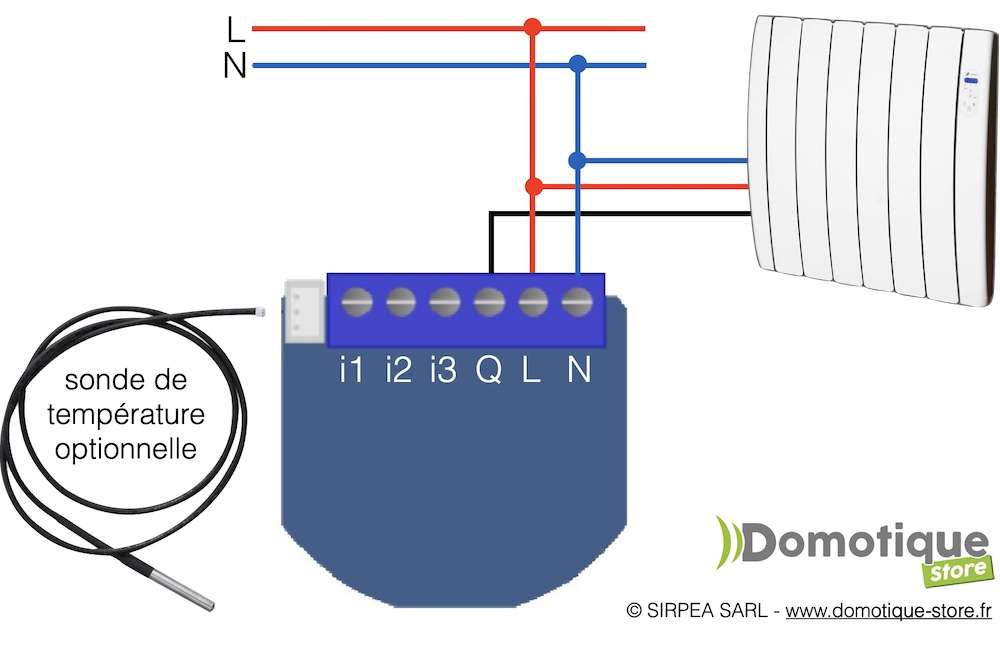
- If you want to manage 3 orders (Comfort / eco / hg) or 2 orders (Comfort / stop or comfort / hg): You can manage these pilot thread modes with a 1N4007 diode connected to a module 1 or 2 outputs depending on the case (follow the link below to have more explanations).
- If you want to manage only 2 “comfort” and “eco” orders : Just connect the Phase 230 V output of a relay actuator module directly on the pilot wire (active output = eco / inactive output = comfort).
Order the temperature to the nearest degree (with a thermostat)
If the thermostat integrated into your radiator is not efficient enough or if you want to be able to order the desired temperature to the near degree instead of just choosing modes (eco, comfort, . ), it may be more of interest to set up thermostatic regulation, that is to say using a Connected thermostat dedicated (material) or either through a software function (virtual thermostat) integrated into most boxes and software Automation.
We will see it after the two cases with their advantages and disadvantages.
In these two cases, we will divert the pilot thread from what it was designed: the thermostat (dedicated or virtual) will transmit heating or stop orders to the pilot wire module which will, in turn, transmit to Radiator of “Comfort” or “stop” pilot wire orders. In order to be sure that the radiator heats up when the pilot wire module sends it a “comfort” order, it will be necessary to adjust its internal thermostat a little higher than the maximum temperature that you want to be able to reach with the home thermostat. Example: If you want to be able to heat up to at least 22 ° C with the home automation thermostat, we recommend that you adjust the thermostat of your radiator to 24 ° C. In this way, the radiator will heat up well until the home automation thermostat decides to stop it (via the “stop” wire order). If you put a lower temperature, the radiator may stop before the desired temperature is reached.
Set up thermostatic regulation using a connected thermostat
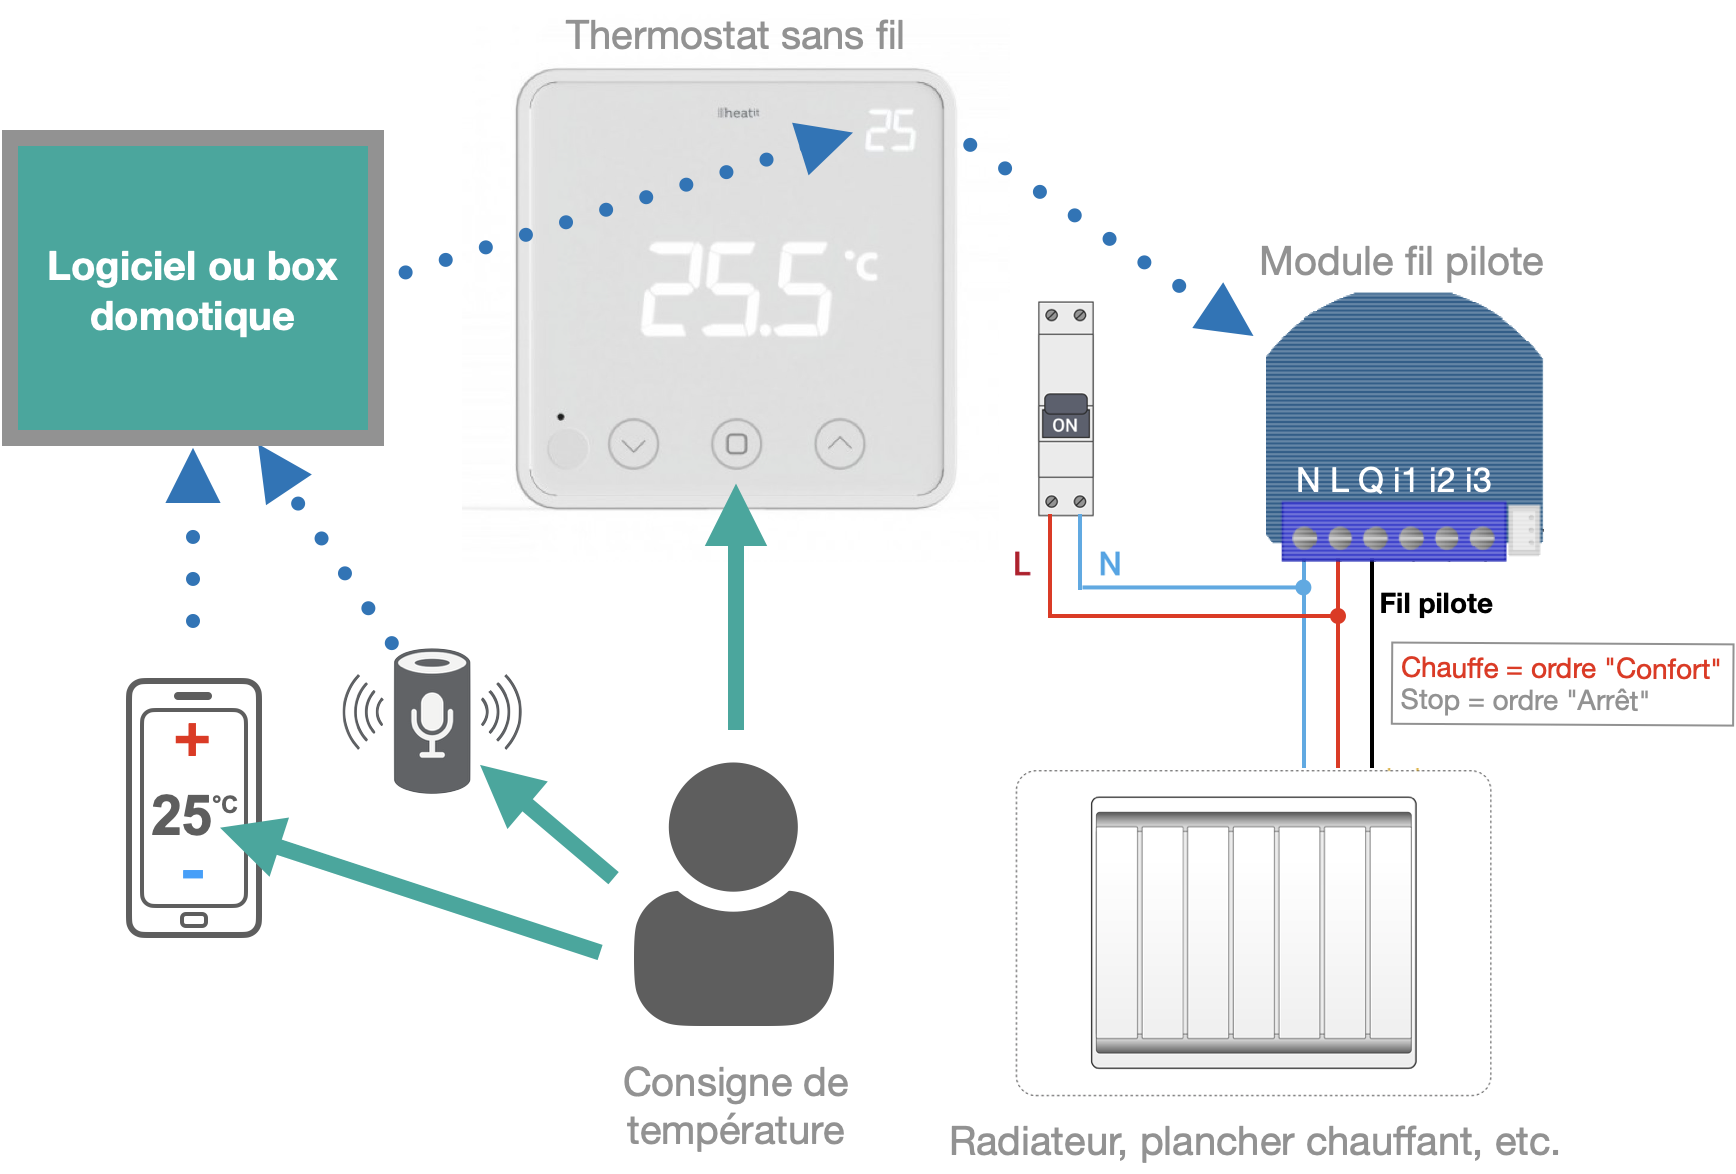
The idea here is to use a Connected wireless thermostat whose role will be to regulate the temperature of the part depending on the instruction that you will have set (via its buttons or via the system Automation)). The thermostat will control the heating cycles of the room’s radiator (s), wireless, through a module (s) pilot wire z-wave qubino zmnhjd1.
In this configuration, two models of thermostats can be used to carry out the regulation. You will find in the table below, the differences between these two models:
In terms of configuration, once the pilot wire modules and the thermostats included in your home automation system, it will be enough to create direct Z-Wave associations by adding the pilot wire modules to be controlled to group 3 of the thermostat (s) (s) concerned.
Hysteresis regulation
Hysteresis regulation is the simplest regulatory system.
When the temperature drops below a minimum threshold (set temperature – delta), heating starts and then dies as soon as the temperature has exceeded the maximum threshold (set temperature + delta). Example: for a set temperature of 20 ° C and a Delta of 0.5 ° C; The heating will start at 19.5 ° C and then go out at 20.5 ° C.This type of regulation is perfectly suited for fast and low inertia heaters (e.g. small room and electric radiator with low inertia as a convector or a radiant).
On the other hand, in the event of high inertia (central heating, electrical accumulation radiator, heating floor, etc.), it will tend to create important oscillations above and below the desired temperature. Indeed, because of the significant inertia of a heating system (e.g. electrical accumulation radiator), when the thermostat decides to stop the heating because the set temperature + delta (eg 20.5 ° C For 20 ° C requested + Delta of 0.5 ° C) will have been reached, the radiator will remain hot for a while and will therefore continue to raise the room temperature above the desired temperature. Likewise when the minimum temperature has been reached (ex: 19.5 ° C for 20 ° C requested and Delta of 0.5 ° C), the thermostat will strengthen the heating, but, if it takes time to heat and that the part is poorly insulated, the room temperature will continue to lower the time that the radiator rises in temperature.
PID regulation
To overcome this problem, there are thermostats using a more complex regulation logic called PID (proportional, integral, derivative).
The thermostat, by complex mathematical math calculations will try to gradually get closer to the desired temperature without exceeding it (or as little as possible) and thus stabilize the temperature as close as possible to the instructions. In addition, in order to stabilize the temperature, the thermostat will make cycles with heating times increasingly short as it will get closer to the set temperature. Note that on heaters whose power can vary, the PID system can modulate the power instead of modulating the heating time by cycles (eg with thermostatic heads, the power modulation will be done by a more or less opening opening valve).
Ex: 2 ° C of the instruction, the thermostat will heat 100 % of the time (5 min every 5 min), then at 1 ° C of the instruction, it will heat 60 % of the time (3 min every 5 min ) then more than 20% of the time at 0.5 ° C (ex: 1 min every 5 min).
The PID system will also self-coring. Indeed, in the event of an excessive exceeding of the instruction or difficulty in reaching it, it will modify certain parameters of the mathematical equation in order to try to improve the result in the following cycle; And so on.
This system is therefore much more efficient than regulation by hysteresis . provided that it is well configured.
Indeed, on most PID thermostats, it is at least possible to adjust the duration of the cycles (shorter for low inertia heating, longer for a high inertia heating) but there are sometimes even more complex settings.
In case of poor configuration, the results can be very far from those expected and worse than with a simple thermostat in Hysteresis. The best can be the ennemi of the property .In conclusion
- In small well -insulated rooms and with low inertia heating, a thermostat with regulation by hysteresis is more than enough.
- In large parts (and/or poorly insulated) with a high inertia heating system, a PID regulatory themrostat will be preferable, provided you configure it well.
TO KNOW MORE
Set up a virtual thermostat on the box or home automation software
Homeland boxes and software often offer a virtual thermostat function.
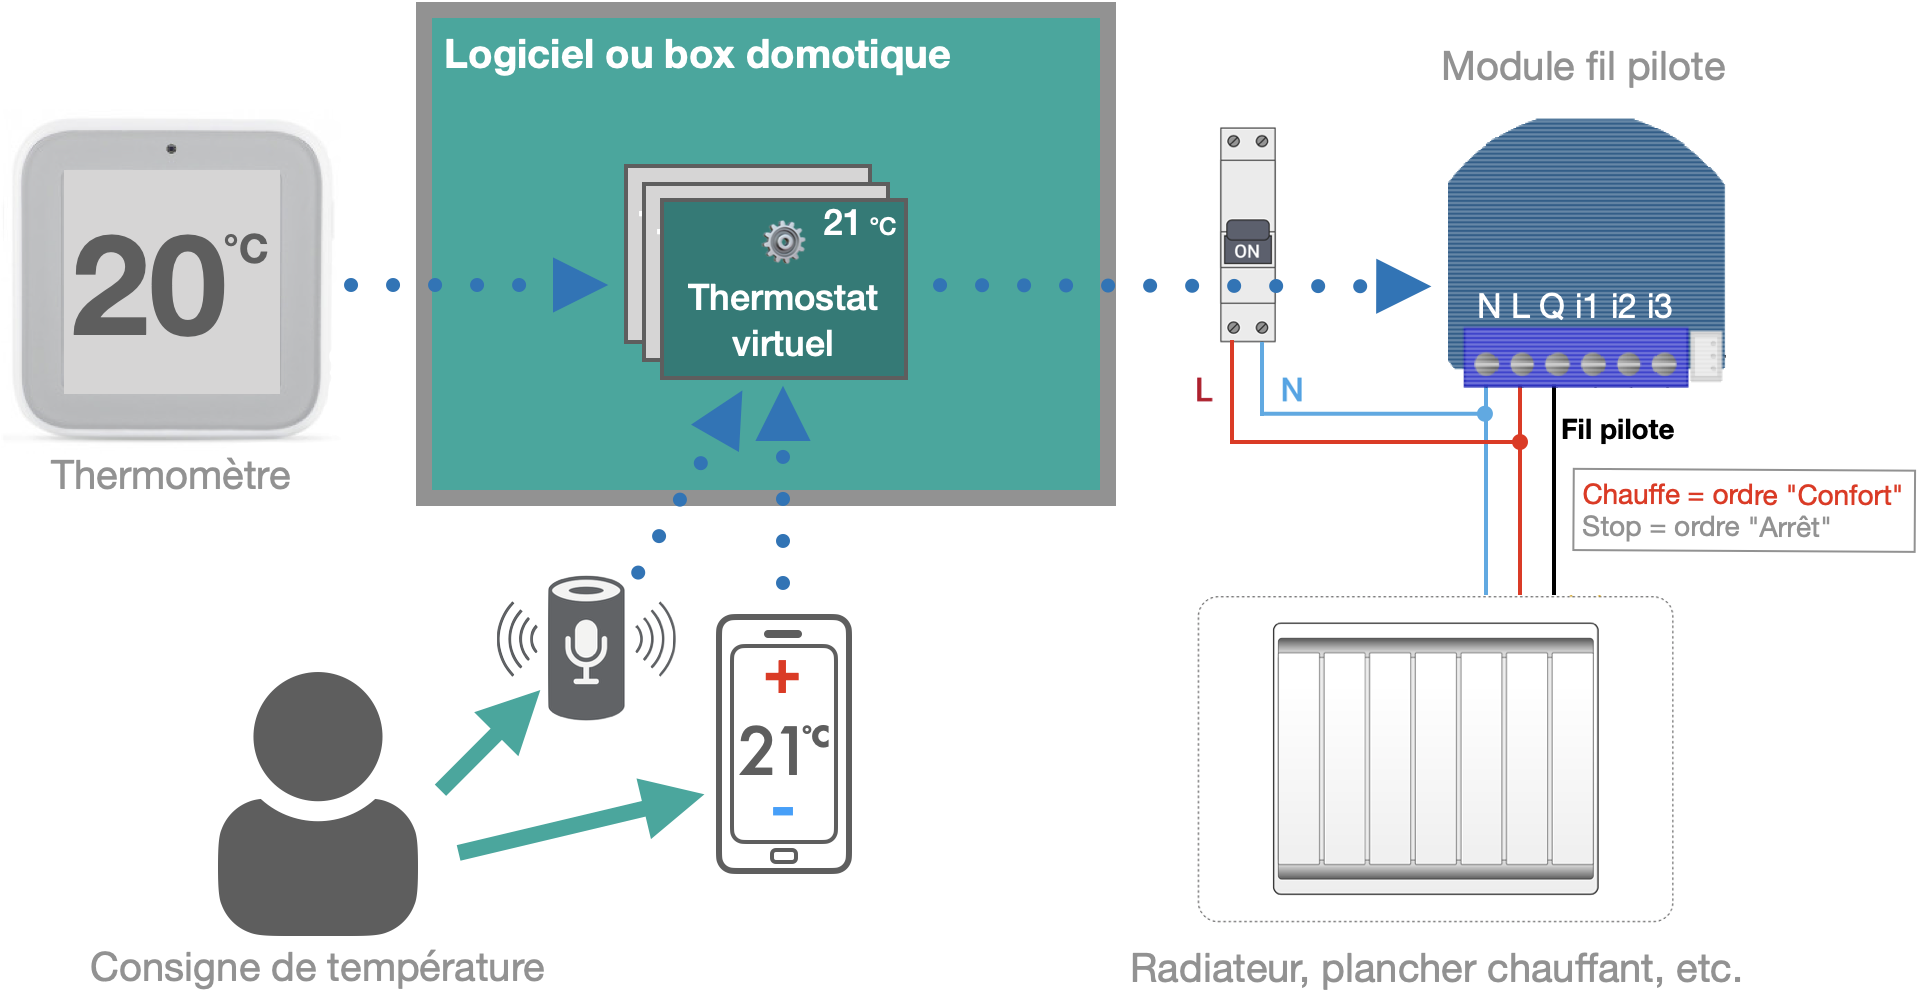
The principle of a virtual thermostat is to use a simple temperature probe to measure the room temperature and leave the regulation work on the box or Domotic software.
The virtual thermostat then commands the actuator modules (s) of your choice and regardless of the protocol (see the first paragraph dealing with different ways to order radiators by their pilot wire). You can easily use temperature probes of a protocol and actuators from another, as long as your software or home automation box communicates with both. Note each time in the case of Z-Wave or ZigBee probes, it can sometimes be more appropriate to use actuators of the same protocol in order to, if necessary, build or improve the mesh network of this protocol thanks to the repeating functions integrated into the integrated functions integrated into Modules in the mains.
A virtual thermostat is potentially more efficient than a connected thermostat. On the other hand, the regulation of heating becomes dependent on the proper functioning of the box or the home automation software.
Note that the same box or home automation software can generally create as many virtual thermostats as desired.
As for connected thermostats, virtual thermostats can operate by hysteresis or with a PID or equivalent logic. Better still, some virtual thermostats (Eedomus+ or Jeedom for example) are also capable of taking into account the variations in outside temperature in their regulation logic and thus, for example, anticipating temperature drops in the house when the temperature drops quickly outdoors. This system is all the more useful with a high inertia heating installation and what is more if the insulation of the house is not very good.
Good news: it is not necessarily necessary to have an outside temperature probe to integrate these measurements into the regulation logic. Most home automation boxes and software have the Internet -based weather functions and recovering real -time measurements from the nearest weather station. In general, the measures are very close to what you would have measured by yourself and are even often more reliable because it is measured with sensors perfectly protected from the sun and other elements that could disrupt the measures.
Example with an eemomus+
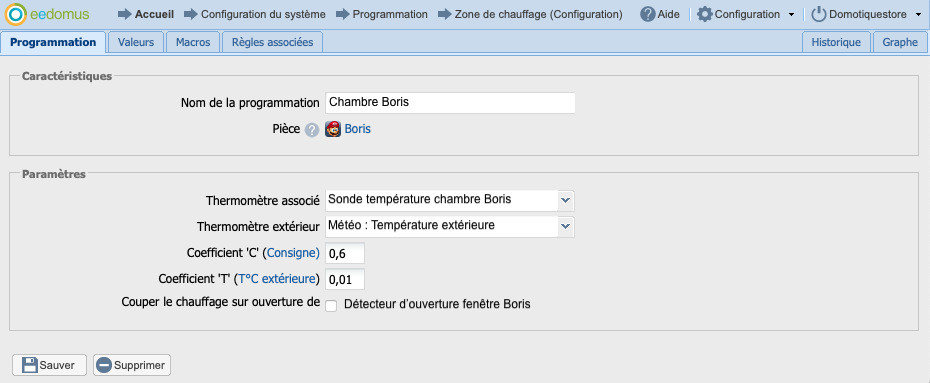
When creating the virtual thermostat, the EEDOMUS will ask you to select the actuators who will order your heating for this area/part (pilot module (s), etc.)).
You can also specify:
- The room temperature probe
- Outdoor temperature (optional): weather data or outside temperature probe
- The window opening (s) (s) (optional), in order to automatically cut the heating of the part concerned during ventilation periods.
- The coefficients “C” and “T” are used to configure the PID “type” regulation but can generally be left by default (more explanations on the heating algorithm of the Eemomus by following this link).
- It will then be possible to pilot this heating area via the dedicated widget on the web interface or the smartphone app but also plan the desired temperatures via the “agenda” function of the EEDOMUS+ and/or via rules.
The “agenda” function of the EEDOMUS allows you to define standard days (ex: we, week at work, Wednesday with children at home, vacation absence, etc.) with periods (eg lifting, absence, evening, bedtime, etc.) planned differently depending on the standard days. You can then define typical weeks and then exceptional dates (home vacation, absences, etc.)). This system, once properly configured is much more powerful than a frozen weekly programming.

Example with Jeedom
On Jeedom, you can use the official thermostat plugin (€ 8). As often, the approach is more complete and more customizable but also a little more complex than what is found on Eemomus.
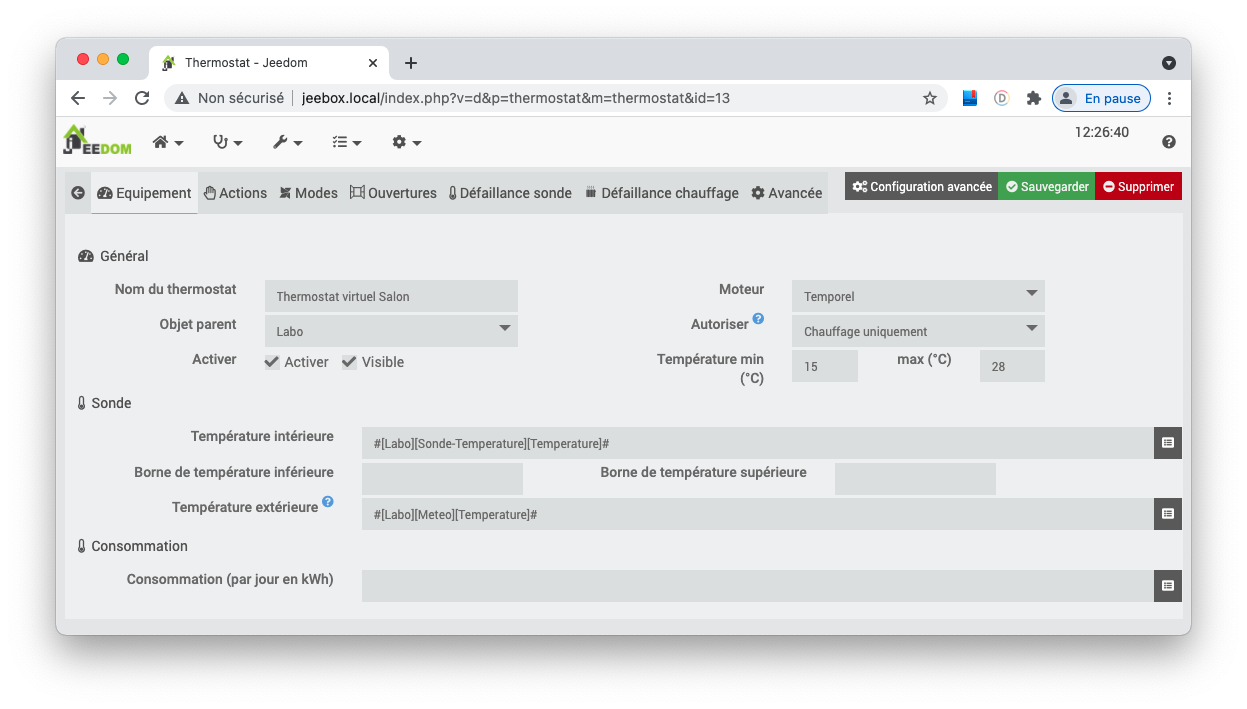
You can define for each virtual thermostat created:
- The operating mode: “temporal” (comparable to PID) or hysteresis.
- The room temperature probe concerned (it is also possible, via a “virtual”, to make an average of several sensors).
- The outside temperature (weather measure or dedicated sensor).
- The actions to be performed to heat (e.g. Comfort pilot wire mode) or stop heating (e
- Create modes bearing the names you want (ex: night mode) and performing the actions you want (temperature, heating stop, etc.))
- The opening sensors (s) (optional) to automatically cut the heating during ventilation periods.
- The actions to be carried out in the event of a probe failure or heating (e.g. putting the radiators in “out of frost” mode and sending you a notification to warn you).
- Set the duration of the cycles and other parameters according to your heating system.
Which temperature probe to choose ?
Many choices are possible but we have retained the following probes (largely for their responsiveness / regularity in the transmission of measurements):
1 The Z-Wave and Zigbee protocols operate in a mesh network, that is to say that the modules supplied on the mains include a repeating function and that the protocol automatically calculates the optimal road between the equipment. In the absence of a mesh network, the communication distance may be limited .
Updated on: 19/10/2021 at 4:42 PM Author: Jérôme Massiaux, home technician-store.Fr
Recommend this article
These articles could also interest you
- Domoticizing its central heating by water radiators (collective, gas, fuel, PAC)
- Domoticizing its central heating with hydraulic heating floor
- Domoticizing its pilot wireless electric heating
- Domoticizing your lighting: case of the simple button with neutral.
- Domoticizing your lighting: case of the double button with neutral.
Discussions about the article
The new questions are displayed at the same time as the technician’s answer. We generally answer in less than a working day, nevertheless, certain questions may require additional tests or research and increase this period. We reserve the right not to publish or answer after-sales service questions concerning a product that has not been bought in our store.