


Smart Home – Braini, how to configure the Home Control app for your connected home? Individual | Great
![]()
How to configure the Home Control application for a connected house
Once the Home + Control application is installed on your smartphone, open it.
Smart Home Control
This project features A Smart Home Platform, where all the IoT Devices Inside (Lights, Microwave, TV) can be turned on/off using Brain Signals (EEG). This platform is of the Interest to Both Able-Bodied But also Users with Health Challenges Like Als, Parkinson or Cerebral Palsy.
Smart Homes Have Been An Active Area of Research, However Despite Considerable Investment, they are not yet a reality for end-users. Moreover, there are Still Accessibility Challenges for the Elderly or the Disabled, Two of the Main Potential Targets for Home Automation. In this exploratory study we designed a control mechanism for smart homes based on Brain Computer Interfaces (BCI) and apply it in the smart home platform in order to evaluate the potential interest of users about bcis at home. We En Enable Users to Control Lighting, A TV Set, A Coffee Machine and the Shutters of the Smart Home. We evaluated the performance (accuracy, interaction time), usability and feasibility on 12 healthy subjects and 2 disable subjects and postponed the results.
We have performed Our Study at The “Domus” Smart Home Which is part of the experience platform of the laboratory of computer sciences of grenoble. “Domus” is a fully Functional 40 Meters Square Flat with 4 Rooms, included in Kitchen, A Bedroom, A Bathroom and A Living Room. The flat is equipped with 6 cameras and 7 microphones to record audio, video and to monitor experience from a control room connected to “domus.»
The flat is equipped with a set of sensors and actuators using the KNX (Konnex) Home Automation Protocol. The Sensors Monitor Data for Hot and Cold Water Consumption, Temperature, CO2 Levels, Mudity, Motion Detection, Electrical Consumption and Ambient Lighting Levels. Each Room is also equipped with Dimmable Lights, Roller Shutters (Plus Curtains in the Bedroom) and Connected Power Plugs that can be remotley actuated.
How to configure the Home + Control application for a connected house ?
Legrand Home + Control application is free. Simple and intuitive, it allows you to configure your Céliane ™ with Netatmo, Mosaic ™ with Netatmo or Dooxie ™ with Netatmo Installation in a few steps.

Access to sections
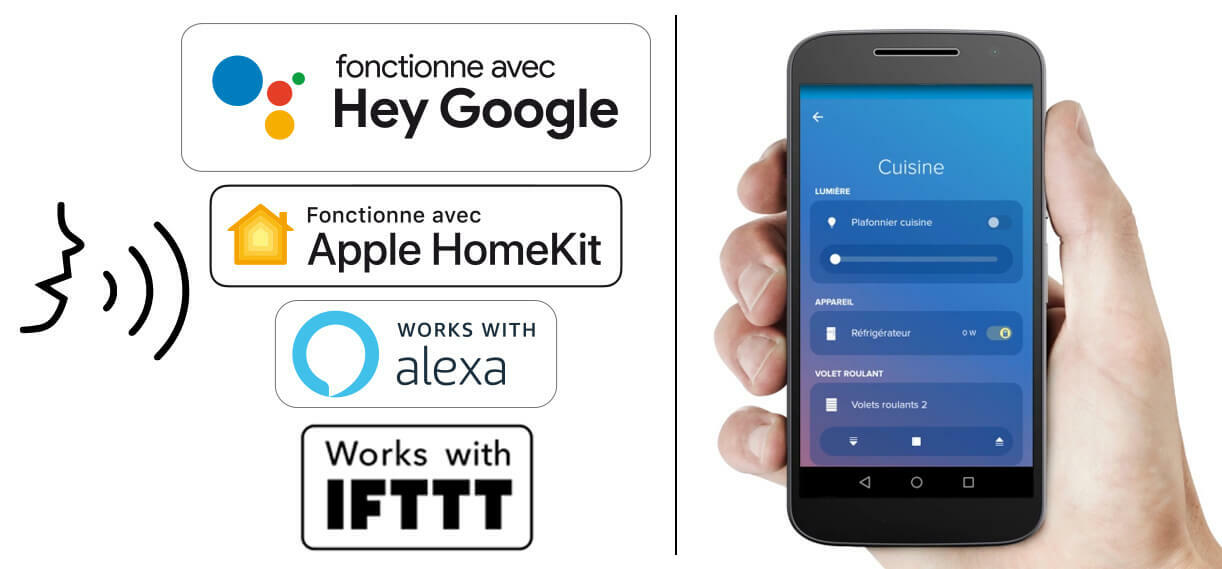
Order the house via the smartphone or the voice
The Home + Control app allows you to control your connected installation via:
- some orders,
- Apple’s Siri vocal assistants, Amazon’s Google and Alexa assistant,
- Smartphone, Android or iOS.
Steps prior to the configuration of the connected house
Before downloading the Home + Control app, check that you are well responding to the prerequisites for use:
- Having installed the Céliane ™ with Netatmo starter kit.
- Have a Wi-Fi Internet box and an email address.
- Have an Android 5 smartphone.0 or iOS 9 minimum.
- Your smartphone must be connected in Wi-Fi to your box.

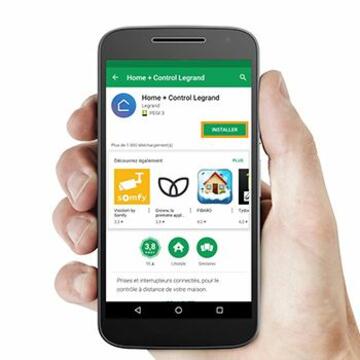
Step 1: Download the Home + Control app and create an account
Start by downloading the Home + Control application from Google Play for free for Android or the IOS App for your smartphone.

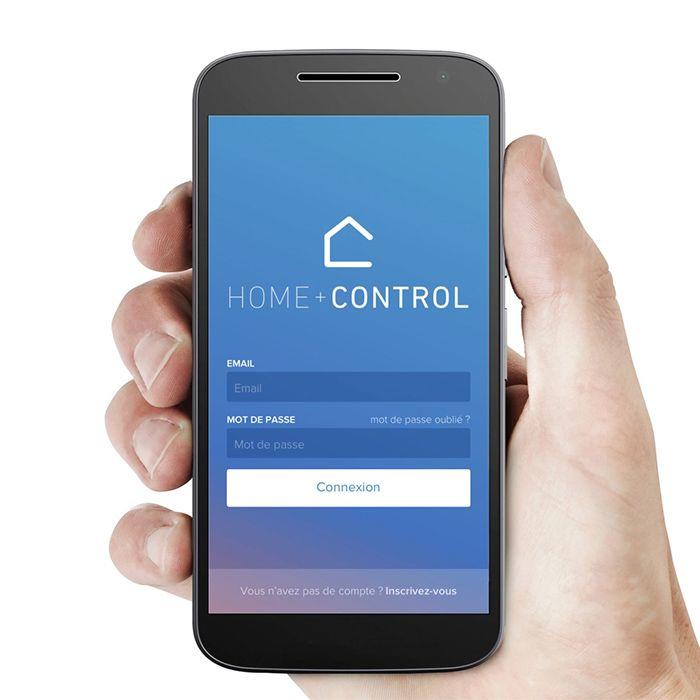
Connect
Once the Home + Control application is installed on your smartphone, open it.
- If you have a Legrand account, fill in your identifier (e-mail) and password.
- If you do not have an account yet, press the “Register” button at the bottom of the screen and follow the few simple steps for the creation of an account.
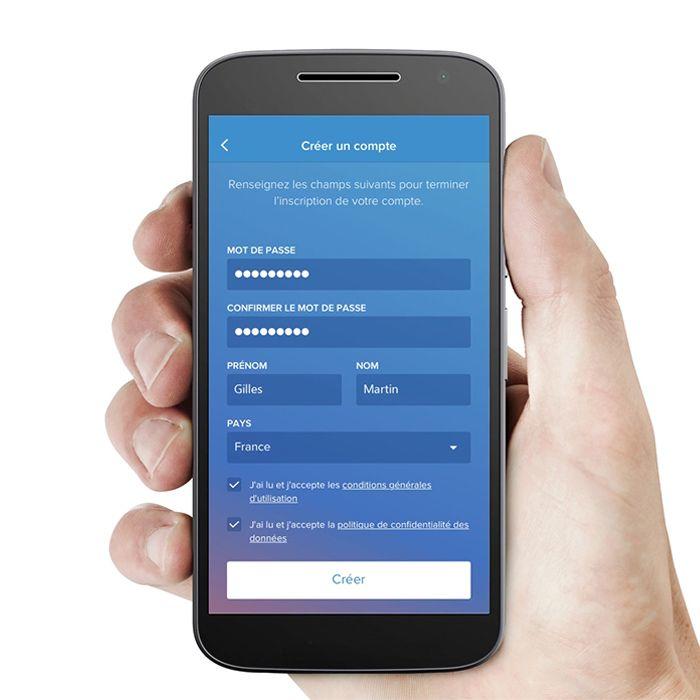
The steps to create a home + control account
1. Fill your email address
2. Press “Send the verification code”
3. Enter the verification code received on your mailbox in the entry field and press “Check the code”
4. Inform the requested information: password, first name, last name, country and press “Create”
5. Validate all of the questions you are asked to be able to start the configuration

Step 2: Configure your connected installation
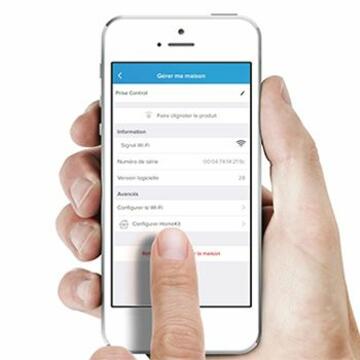
Press “Install a new house” in the “Settings” menu to access the configuration.
To configure your connected installation in the Home + Control app, follow the step -by -step steps in the application.
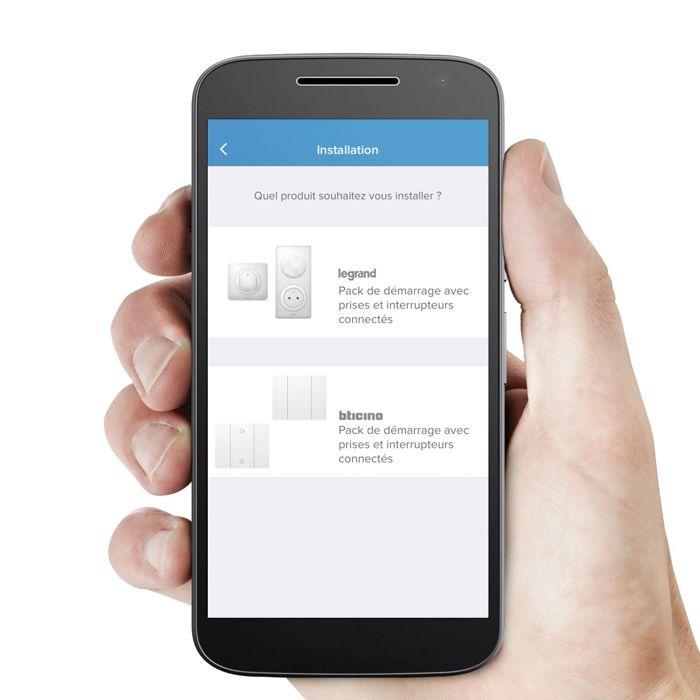
Specify the brand of your connected products
Start by indicating the brand of the products you want to install: for example “Legrand” for Céliane ™ with Netatmo or “BTICINO” connected sockets to install a connected doorman in your home.
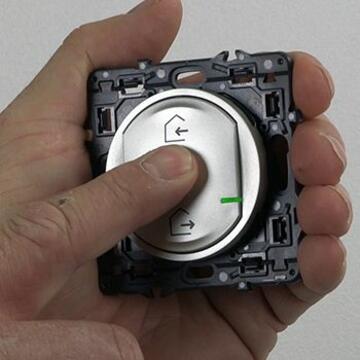
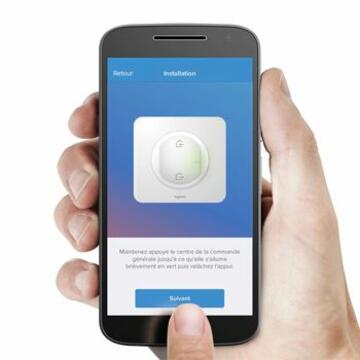
Connect the box to the control
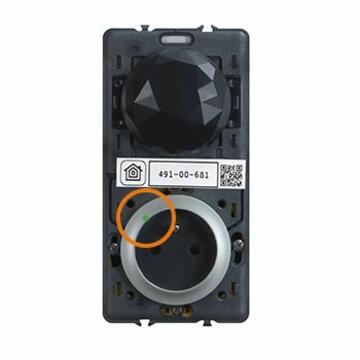
Get your general wireless / arrival wireless order, included in the start-up pack for Céliane ™ with Netatmo connected accommodation. Maintain a finger pressed in the center of the command until the light turns on green. Then release the support.
In the Home + Control application, press “Next”.
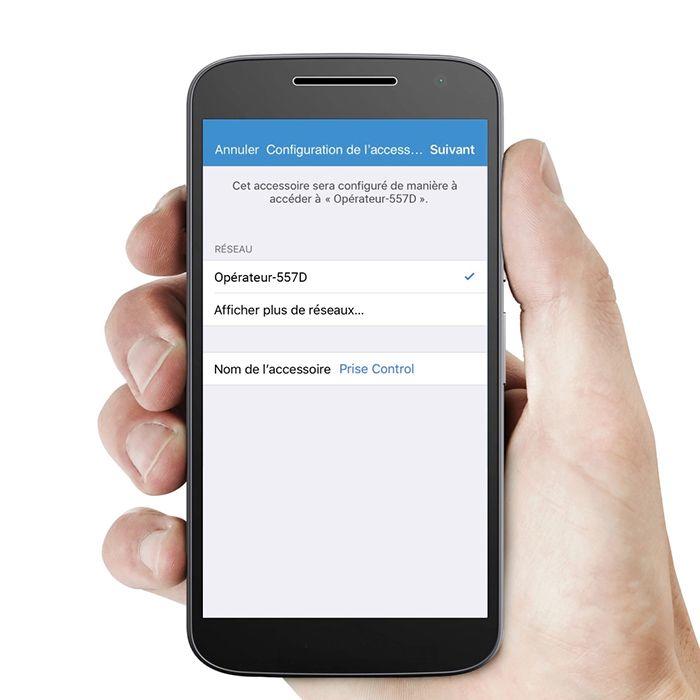
Specify the WiFi network of housing
In the list of networks offered by the Home + Control app, select the WiFi network of your accommodation so that the control control (also provided in your Céliane ™ with Netatmo and previously installed start -up pack).
The following handling differs according to your smartphone.
If you are on Android, enter the password of the Wi-Fi network.
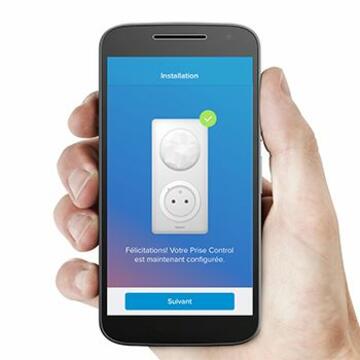
Successful network connection !
After adding the password of the Wi-Fi network, a Green Picto tells you that the connection is effective, with the following message: “Congratulations ! Your control is now configured “.
Note that the light of your control control is also light. Press “Next”.
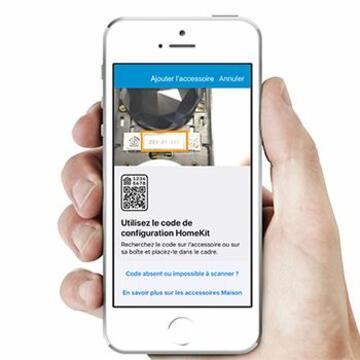
If you use an iPhone (under iOS)
At this stage, flash the single -use homekit configuration code located on the control control. You will be able to control your installation connected by the voice via Siri, Apple’s vocal assistant.
Name your house in the app
For all types of smartphones, you still have to finalize the configuration of your connected installation. To do this, name your connected home in the Home + Control app. For example: “main house”. Then press “finished”.

Step 3: Create parts and affect products
You will now assign in the application the connected sockets and switches that you or your electrician have installed in each room of the house. Press “Start”.
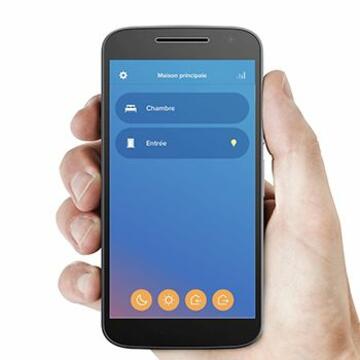
You are then redirected to a list of parts. You can personalize their names at any time. For example: “Enzo room”.
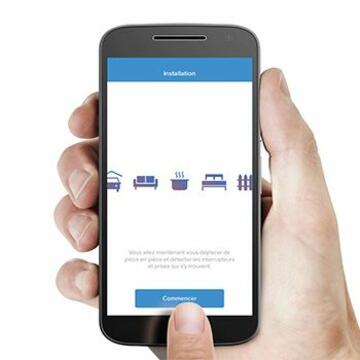
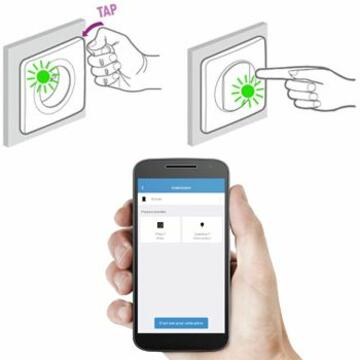
Detect connected products
Select the room in which you are and press “Validate”. Then, pat 3 times on connected sockets or connected lighting micromodules and press the switches you have installed in the room 1 time in the room. Your connected products appear as you go on the app screen.
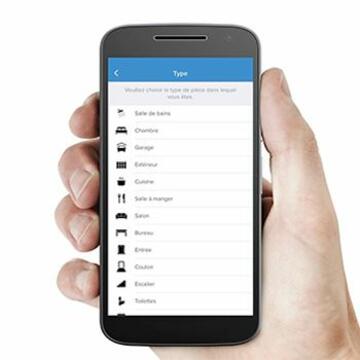
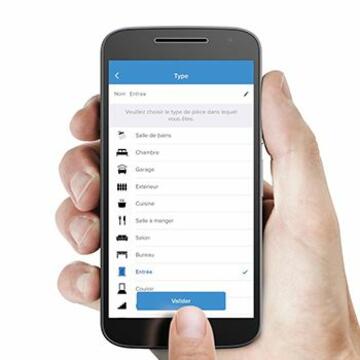
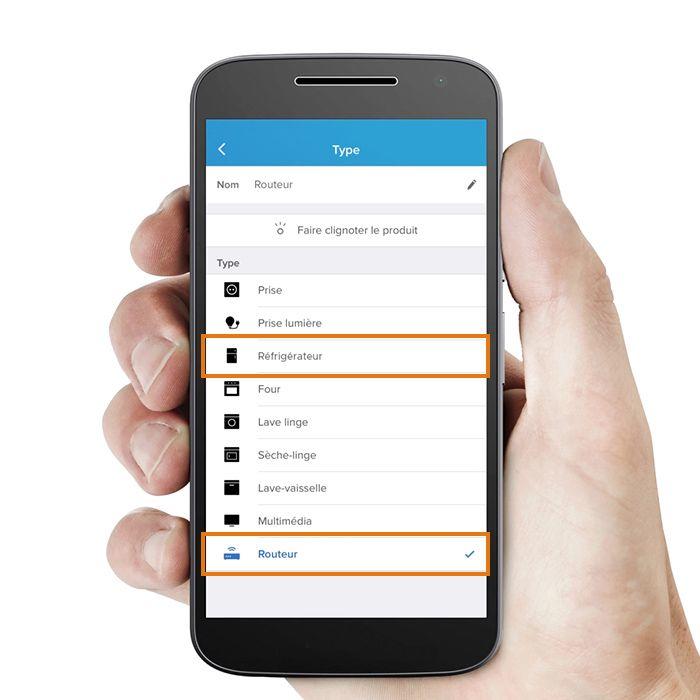
Assign a “type” to each connected product
You can now assign a type to each socket or switch by selecting it with a simple support on its name. It is a question of specifying the use of your socket or switch. If you choose the type “router” or “refrigerator” for a socket, it will remain under tension, especially during a “departure” life scene.
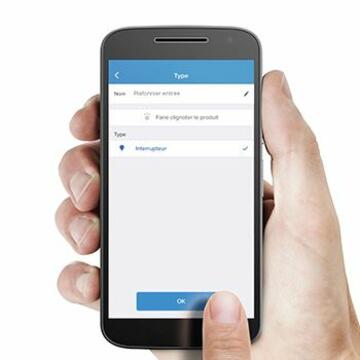
Rename the products to better spot them
At this stage, it is also advisable to rename the products installed to better spot them. To do this, simply press the product to name. Via the modification tool, enter a name. Press “OK”. The name has been updated.
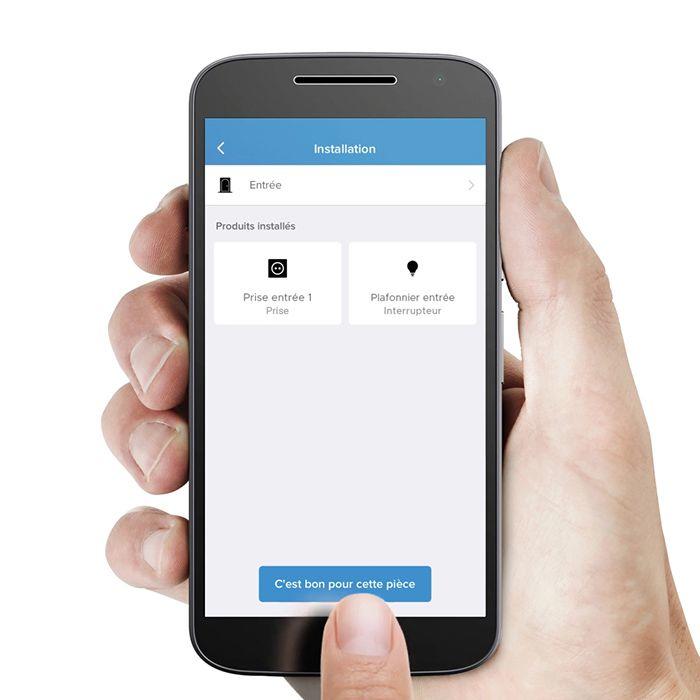
Allow and rename the products throughout the house
Once all the connected products installed in the room have been detected and named, press “It’s good for this room”.
Then repeat the operations of step 3 for each room in the house.
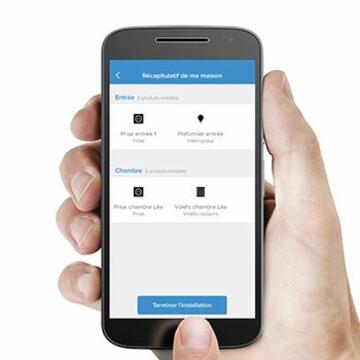
Finish installation
Press “Finish installation”. All configured parts are displayed in your home + control app. Your connected installation is now operational. You can modify it at any time.
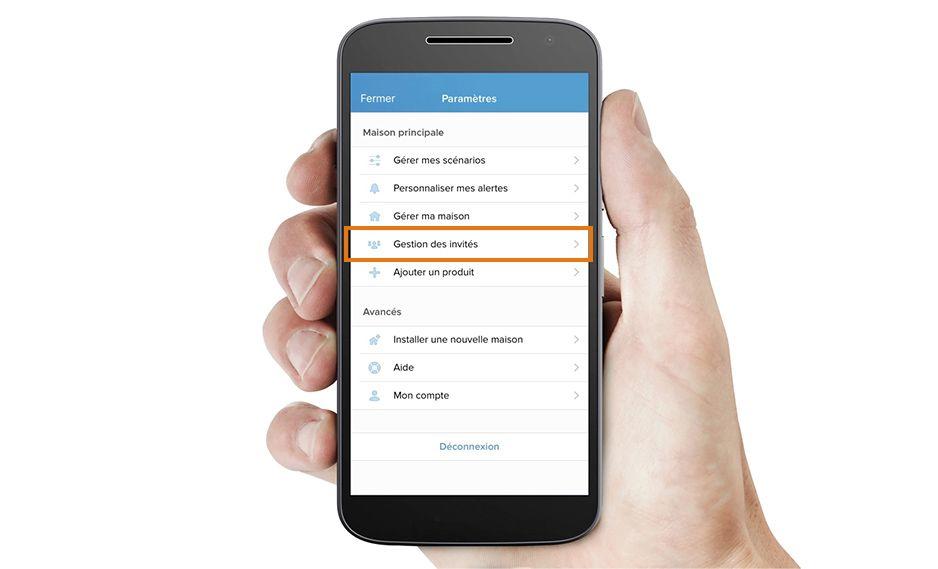
To go further: invite users
With the Home + Control app, it is possible to easily add guests and thus share the smartphone piloting of your installation connected with family or friends. To add a guest, go to “Settings” / “Guest management”.
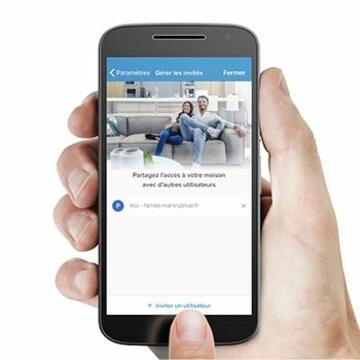
Press “Invite a user” and send the invitation.

Registration and deletion of a guest
Your guest receives an email with a link allowing him to respond to the invitation. He must then register.
To delete access, go back to the guest screen and click on the cross associated with the guest concerned and then confirm the deletion.