


Connect to a VPN in Windows – Microsoft support, how to configure a VPN?
![]()
How to configure a VPN
If you have a smartphone under Android or iOS turning on a recent version, no worries. Ditto for a PC or hybrid under Windows 10. The manual implementation of a VPN with Macos is also possible. Let’s not forget either GNU/Linux, The most used free system in the world. Finally, there is the Freebox FAI Free, which was the first of the market to offer VPN care. We will see in this tutorial how to configure all these devices.
Connect to a VPN in Windows
Whether for professional or personal use, you can connect to a virtual private network (VPN) on your Windows PC. A VPN connection can provide you with a more secure connection and access to the network of your business and the Internet, for example, if you work from a coffee or a public place of this type.
Noticed : This feature is not available in Windows 11. Learn more
Create a VPN profile
Before you connect to a VPN, you must have a VPN profile on your PC. You can either create your own VPN profile or configure a professional account in order to obtain a VPN profile from your business.
Before starting:
- If you create a profile for professional use, you can find the VPN settings and/or a VPN application on the intranet site of your business when you are at work, or contact the person in charge of your company technical support.
- If it is a VPN service to which you subscribe for personal use, visit the Microsoft Store to see if there is an application for this service, then access the VPN service website to see if the settings of VPN connection to be used are listed.
Once you have your professional or personal VPN parameters:
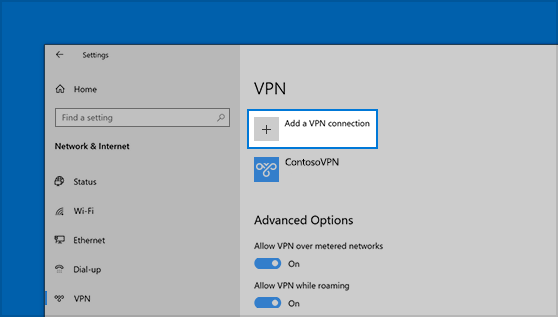
- Select To start up THE settings >>Network & Internet >VPN >Add a VPN.
- Below Add a VPN connection, Proceed as follows:
- In VPN supplier, Choose Windows (integrated).
- In the zone Connection name, Enter a name you will recognize (for example, my personal VPN). This is the VPN connection name you are looking for when you connect.
- In the zone Name or server address, Enter the address of the VPN server.
- For Virtual private network type, Choose the VPN connection type to be created. You must know the type of VPN connection used by your company or by the VPN service.
- For Type of identification info, Choose the type of connection information (or identification information) to be used. It can be a username and a password, a single -use password, a certificate or a smart card if you log into a VPN for professional use. Enter your username and password in the corresponding areas (if necessary).
- Select Save.
If you must modify VPN connection information or specify additional parameters, such as proxy settings:
- In the VPN settings page, select the VPN connection you want to modify, select Advanced options, Then to modify In view of the details you want to update. Once you have carried out the necessary updates, select Save Or Apply.
Connect to a VPN
Once you have a VPN profile, you can connect.
Connect quickly to a VPN from your taskbar:
- In the taskbar, select the icon Network, volume, battery >VPN.
- In the list of VPN connection names, select that of your choice, then select To log in.
- If you are invited, enter your username and password or other connection information.
Connect to a VPN from the Windows settings page:
- Select To start up THE settings >>Internet network & VPN >.
- In view of the VPN connection you want to use, select To log in.
- If you are invited, enter your username and password or other connection information.
You will know that you are connected to a VPN in two ways:
- In the VPN settings page, the name of the VPN connection is displayed connected below.
- In the taskbar, a blue shield is displayed when you are connected to a recognized VPN.

Whether for professional or personal use, you can connect to a private virtual network (VPN) on your Windows 10 PC. A VPN connection can provide you with a more secure connection and access to the network of your business and the Internet, for example, if you work from a coffee or a public place of this type.
Create a VPN profile
Before you connect to a VPN, you must have a VPN profile on your PC. You can either create your own VPN profile or configure a professional account in order to obtain a VPN profile from your business.
Before starting:
- If you create a profile for professional use, you can find the VPN settings and/or a VPN application on the intranet site of your business when you are at work, or contact the person in charge of your company technical support.
- If you want to subscribe to a VPN service for your personal use, browse the Microsoft Store to check if there is an application for this service, then access the VPN service website to find the VPN connection settings to use.
- Select the button To start up , Then select Settings >Network & Internet >VPN >Add a VPN connection.
- In Add a VPN connection, Proceed as follows:
- In VPN supplier, choose Windows (integrated).
- In the zone Connection name, Enter a name you will recognize (for example, my personal VPN). This is the VPN connection name you are looking for when you connect.
- In the zone Name or server address, Enter the address of the VPN server.
- For Virtual private network type, Choose the VPN connection type to be created. You must know the type of VPN connection used by your company or by the VPN service.
- For Type of identification info, Choose the type of connection information (or identification information) to be used. It can be a username and a password, a single -use password, a certificate or a smart card if you log into a VPN for professional use. Enter your username and password in the corresponding areas (if necessary).
- Select Save.
- If you need to modify VPN connection information or specify additional parameters, such as proxy settings, choose the VPN connection, then select Advanced options.
Connect to a VPN
Once you have a VPN profile, you can connect.
- At the right end of the taskbar, select the icon Network ( Or ).
- Select the VPN connection you want to use, then perform one of the following operations depending on what is happening when you select the VPN connection:
- If the Connect button is displayed under the VPN connection, select Connect.
- If the VPN section opens in settings, select the VPN connection, then Connect.
- If you are invited, enter your username and password or other connection information.
Once connected, the mention Connected is displayed under the name of the VPN connection. To quickly check if you are connected to the VPN when you carry out operations on your PC, select the icon Network (or) at the right end of the taskbar, then check if the mention Connected appears under the VPN connection.
How to configure a VPN ?
In 99% of cases, VPN suppliers offer their users a dedicated application. In a few clicks or support on the screen, you are connected to a secure server anywhere in the world. The configuration steps are reduced to the bare minimum, you just have to worry about choosing the server most suited to your needs.
But – there is always one but – it may sometimes be necessary to make the settings yourself. The reasons for this choice can be varied. Either the VPN supplier does not offer any application, or the latter is not compatible with your system such as GNU/Linux which is often left out. You may also prefer the manual approach for its didactic side.
In all cases, the final result will be the same: your data will be encrypted and will pass safely to the server of your VPN supplier. The manual method is certainly longer to set up, but the benefits remain similar.
1. Prerequisites for configuring a VPN
Before putting your hands in the cudded, you will need a few tools, starting with equipment compatible with the implementation of a VPN. Luckily, modern bones all do it. Even ISP boxes are getting more and more.
If you have a smartphone under Android or iOS turning on a recent version, no worries. Ditto for a PC or hybrid under Windows 10. The manual implementation of a VPN with Macos is also possible. Let’s not forget either GNU/Linux, The most used free system in the world. Finally, there is the Freebox FAI Free, which was the first of the market to offer VPN care. We will see in this tutorial how to configure all these devices.
But before that, there remains a last prerequisite: the identifiers. As a general rule, when you subscribe to a subscription to a VPN supplier, you receive an email containing your identifiers, as well as the parameters to manually set up your VPN client configuration. If this is not the case, you will have to request it by email from your supplier.
Once you have your faithful smartphone/pc/tablet and customer settings, all you have to do is put your hands in the Cambouis. For that, go to the second part of this file !
Now is the time to get into serious things. Rest assured, the manual implementation of a VPN is not complicated. Modern bones all have a VPN client who only expects to receive some settings to operate. Here’s how to proceed.
Cyberghost VPN
- 9415
- 91
- 7 simultaneous connections
- Free trial 45 days
- No data log